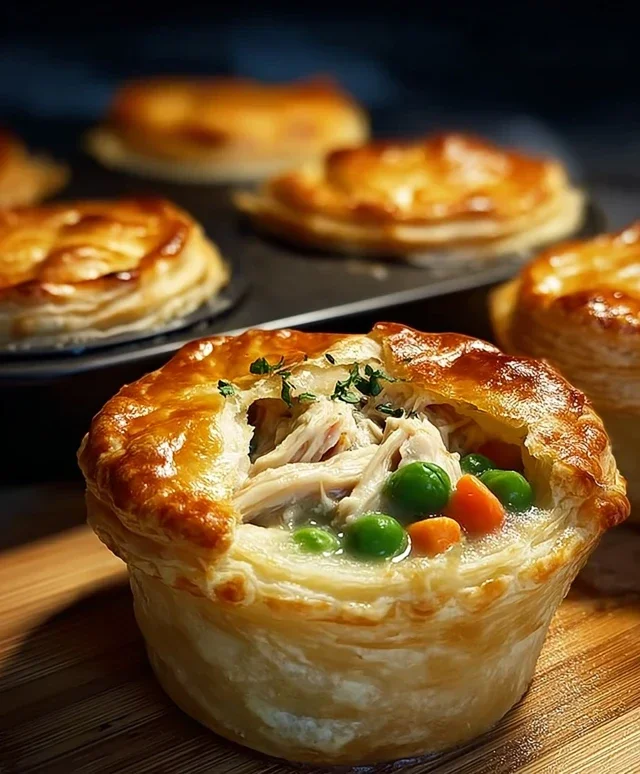
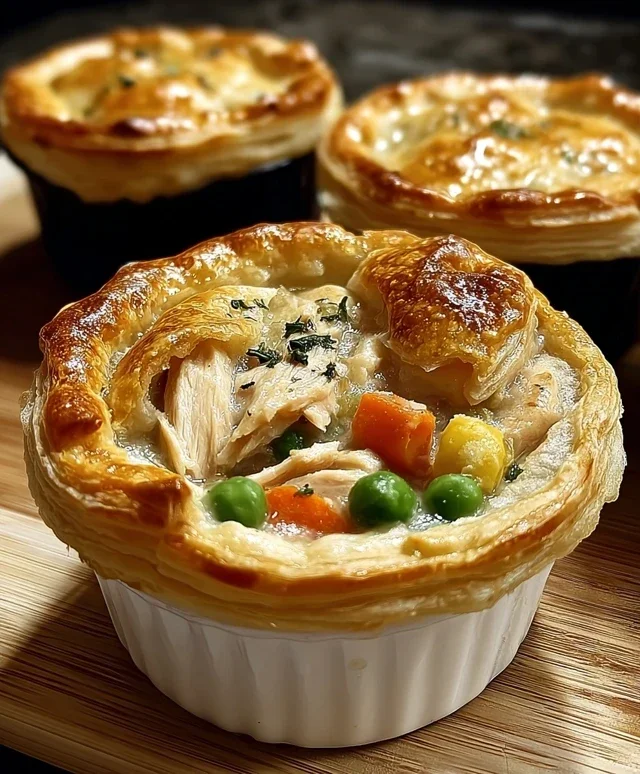
Mini Chicken Pot Pies- Easy & Delicious Comfort Food
Mini Chicken Pot Pies are the ultimate comfort food, delivering a satisfying burst of creamy, savory goodness in every bite. Who can resist that flaky, golden crust embracing tender chicken, sweet peas, carrots, and a rich, velvety sauce? It’s no wonder this classic dish holds such a special place in our hearts and on our tables. What truly makes these mini chicken pot pies so enchanting is their charming, individual portion size. They’re perfect for a weeknight family dinner, a delightful appetizer for guests, or even a whimsical addition to a potluck. Forget the fuss of slicing a large pie; these personal delights are ready to be devoured straight from their ramekins, offering a guaranteed smile and a warm, contented sigh. Get ready to whip up a batch of these irresistible mini chicken pot pies and experience pure, unadulterated culinary joy.
Mini Chicken Pot Pies
There’s something incredibly comforting about a classic chicken pot pie. The creamy filling, tender chicken, and mixed vegetables encased in flaky pastry just screams “home.” But sometimes, a whole pie feels like a bit much, or maybe you’re just looking for a fun, individual-sized treat. That’s where these delightful mini chicken pot pies come in! They’re perfect for weeknight dinners, game day snacks, or even a cozy lunch. Using convenient refrigerated biscuits makes them wonderfully quick and easy to whip up, so you can enjoy that homemade pot pie goodness without a whole lot of fuss.
Ingredients:
Instructions:
First things first, let’s get our chicken ready. You’ll want to dice your ½ lb of boneless chicken breast into small, bite-sized pieces. Think roughly ½-inch cubes. This ensures the chicken cooks through evenly and is easy to eat in our mini pies. You can cook the chicken in a few ways: you can boil it until cooked through and then dice it, or if you’re looking for a quicker option, you can sauté the diced chicken in a lightly oiled pan until it’s no longer pink. For this recipe, I find sautéing it directly in the pan we’ll use for the filling is most efficient. Season the chicken with a pinch of salt and pepper as it cooks. Once cooked, set it aside for a moment while we prepare the filling.
Now, let’s make that luscious filling. In the same pan you used to cook your chicken (no need to wash it – more flavor!), add the can of cream of chicken soup. This soup is the base of our creamy, dreamy filling. Stir in the ½ tsp of garlic powder and ½ tsp of onion powder. These simple spices add a wonderful depth of flavor that complements the chicken and vegetables beautifully. Don’t forget to add the ¼ tsp of salt. Give everything a good stir to combine the soup and seasonings into a smooth mixture.
It’s time to bring everything together! Add the cooked diced chicken and the 1 cup of frozen peas & carrots to the cream of chicken soup mixture. Stir everything gently until the chicken and vegetables are evenly coated in the creamy sauce. The frozen peas and carrots will thaw and cook through in the warm filling. This mixture is essentially the heart of our pot pies, so make sure it’s well combined and smells as delicious as it looks!
Next, we prepare our biscuit “crusts.” Lightly spray a muffin tin with cooking spray. You can also use paper liners if you prefer, but the cooking spray usually does the trick nicely. Open up your two cans of refrigerated biscuits. You’ll want to press each biscuit down slightly to flatten it a bit. Then, gently press each flattened biscuit into the bottom and up the sides of each muffin cup. You want to create a little cup or shell for your filling. It’s okay if they don’t reach the very top edge; they’ll puff up as they bake. Make sure you’re pressing the dough to form a good seal at the bottom so your filling doesn’t leak out during baking.
Now for the exciting part – filling those biscuit cups! Spoon the chicken and vegetable filling generously into each biscuit-lined muffin cup. Don’t overfill them to the point where the filling will spill out excessively, but make sure each mini pot pie gets a good amount of that savory goodness. Once all your muffin cups are filled, you can optionally place a small, torn piece of biscuit dough on top of some of the pies for a “lid” if you like, though it’s not essential. This step is purely for aesthetics and an extra bit of biscuit goodness.
Finally, it’s time to bake these little beauties! Place the muffin tin into a preheated oven at 375°F (190°C). Bake for approximately 15-20 minutes, or until the biscuits are golden brown and puffed up, and the filling is hot and bubbly. Keep an eye on them to ensure they don’t burn. The baking time can vary slightly depending on your oven. Once they’re done, carefully remove the muffin tin from the oven. Let them cool in the tin for a few minutes before attempting to remove them. A small offset spatula or a butter knife can help gently lift them out. Serve them warm and enjoy the delightful explosion of flavor in every mini pot pie!
Conclusion:
And there you have it! These Mini Chicken Pot Pies are a truly delightful way to enjoy a classic comfort food in a perfectly portioned package. They’re incredibly satisfying, offering that same creamy, savory filling and flaky crust you love, all in a charming, individual serving. I find them to be the ultimate weeknight meal solution, easily customizable and always a crowd-pleaser. The joy of making these is doubled by how much fun they are to serve, whether at a casual family dinner or a special gathering. Don’t hesitate to get creative with your fillings; this recipe is a fantastic base for all sorts of delicious additions!
For serving, these little pies are wonderful on their own, or you can pair them with a crisp green salad or some roasted vegetables for a complete meal. They also make fantastic appetizers for parties!
As for variations, feel free to experiment with different vegetables like peas, corn, green beans, or even some diced potatoes. You could also swap out the chicken for turkey or even add some crum extractbled beef bacon for extra flavor. The possibilities are truly endless when it comes to these versatile mini chicken pot pies!
I genuinely hope you give this recipe a try. It’s a rewarding and delicious cooking experience that I’m sure you’ll love as much as I do!
FAQs
Can I make these mini chicken pot pies ahead of time?
Yes, you absolutely can! You can assemble the pies completely and then refrigerate them for up to 24 hours before baking. You might need to add a few extra minutes to the baking time if they are coming straight from the refrigerator.
What if I don’t have individual ramekins?
No problem at all! You can use muffin tins for these mini chicken pot pies. Just grease them well or use liners. The baking time might be slightly shorter, so keep an eye on them to prevent over-browning.
Can I use pre-made pie crust?
Definitely! Using store-bought pie crust is a fantastic time-saver and will still yield delicious results for your mini chicken pot pies. Just follow the package instructions for thawing and handling.
Mini Chicken Pot Pies
Quick and easy individual chicken pot pies using canned biscuits and cream of chicken soup.
Ingredients
-
2 cans refrigerated biscuits (8-count each)
-
0.5 lb boneless chicken breast, diced
-
1 cup frozen peas & carrots
-
1 can (10.5 oz) cream of chicken soup
-
0.5 tsp garlic powder
-
0.5 tsp onion powder
-
0.25 tsp salt
-
Cooking spray
Instructions
-
Step 1
Preheat oven to 375°F (190°C). Lightly grease a 16-cup mini muffin tin with cooking spray. -
Step 2
In a medium bowl, combine the diced chicken breast, frozen peas & carrots, cream of chicken soup, garlic powder, onion powder, and salt. Stir until well mixed. -
Step 3
Open the biscuit cans. Separate the biscuits and flatten each biscuit slightly with your hands. -
Step 4
Press one flattened biscuit into the bottom and up the sides of each mini muffin cup, forming a shell. -
Step 5
Spoon the chicken mixture evenly into each biscuit-lined muffin cup. -
Step 6
Bake for 15-20 minutes, or until the biscuit crust is golden brown and the filling is heated through. -
Step 7
Let cool slightly before carefully removing from the muffin tin. Serve warm.
Important Information
Nutrition Facts (Per Serving)
It is important to consider this information as approximate and not to use it as definitive health advice.
Allergy Information
Please check ingredients for potential allergens and consult a health professional if in doubt.