Perfect Grilled Pizza Recipe- Easy & Delicious
How to Make the Perfect Grilled Pizza is a culinary adventure that promises smoky, crispy, and utterly delicious results right in your own backyard. Forget soggy crusts and unevenly cooked toppings; we’re about to unlock the secrets to achieving pizza perfection on the grill. There’s something undeniably magical about grilled pizza – the intense heat of the grill imparts a beautiful char and a delightful chegrape juicess to the dough that you just can’t replicate in a conventional oven. People flock to it because it’s a communal, fun way to cook and eat, transforming a simple weeknight meal into a festive gathering. What makes this grilled pizza truly special is the irresistible combination of textures and flavors – the slight char on the crust, the melty cheese, and the vibrant toppings all coming together in a symphony of taste. Get ready to elevate your pizza game to an entirely new level with this foolproof guide to making the perfect grilled pizza.
How to Make the Perfect Grilled Pizza
There’s something incredibly satisfying about a perfectly grilled pizza. The smoky char from the grill, the slightly crispy yet chewy crust, and the melty, gooey toppings – it’s a culinary experience that’s hard to beat. Forget delivery; making pizza on the grill is surprisingly easy and delivers a flavor profile that’s hard to replicate indoors. This guide will walk you through every step to achieve pizza perfection.
Ingredients:
Making the Dough Ready
The foundation of any great pizza is its dough. It’s crucial that your dough is at room temperature. If it’s cold and straight from the refrigerator, it will be tough to work with and won’t stretch evenly. Let it sit on the counter for at least 30-60 minutes before you plan to start. If you’re using store-bought dough, sometimes it’s already at a good consistency. For homemade, ensure it’s had its primary rise.
Prepping Your Workspace and Grill
Before you even think about toppings, get your grill ready. You’ll want to preheat your grill to medium-high heat, around 400-450°F (200-230°C). This is crucial for achieving that signature char and preventing the dough from becoming soggy. If you have a grill with two burners, you can even set one side to medium-high and the other to medium-low, which can give you more control.
Prepare your pizza-making station. Have your sauce, cheeses, and toppings all prepped and within easy reach. This is important because once the dough hits the grill, things move quickly. If you’re using cornmeal or semolina, sprinkle a little onto a pizza peel or a baking sheet lined with parchment paper. This acts like tiny ball bearings, helping the dough slide on and off the grill with ease.
The Grilling Process
This is where the magic happens. We’re going to grill the dough first, then add the toppings. This two-stage process ensures a crispy crust without burning your toppings.
1. Grill the First Side of the Dough: Lightly flour your work surface and gently stretch or roll your pizza dough into your desired shape, typically a circle or rectangle, about 1/4 to 1/2 inch thick. Be careful not to overwork the dough, as this can make it tough. Brush one side of the stretched dough generously with olive oil. Carefully transfer the oiled side of the dough onto the preheated grill grates. Close the lid and grill for 3-5 minutes, or until you see nice grill marks and the dough is puffed up and starting to firm up. Keep an eye on it to prevent burning.
2. Flip and Add Toppings: Using a spatula and tongs, carefully flip the dough over. You should have beautiful grill marks on the bottom! Now, quickly work your magic. Brush the grilled side (which is now facing up) with olive oil. Spread your pizza sauce evenly over the dough, leaving a small border for the crust. Sprinkle generously with mozzarella and Parmesan cheese. Add your desired toppings. Work swiftly to minimize the time the grill lid is open.
3. Second Grill Phase: Close the grill lid and continue to cook for another 5-8 minutes. The heat from the grill will melt the cheese and cook your toppings. The underside of the crust will continue to crisp up. Keep an eye on the cheese to ensure it’s melted and bubbly, and the crust is golden brown and cooked through. If one side is cooking faster than the other, you can rotate the pizza on the grill.
4. Check for Doneness and Remove: To check if your pizza is done, you can gently lift an edge with a spatula. The crust should be firm and golden brown on the bottom. The cheese should be fully melted and possibly have a few delightful browned spots. Once satisfied, carefully slide the pizza off the grill onto a cutting board or pizza peel.
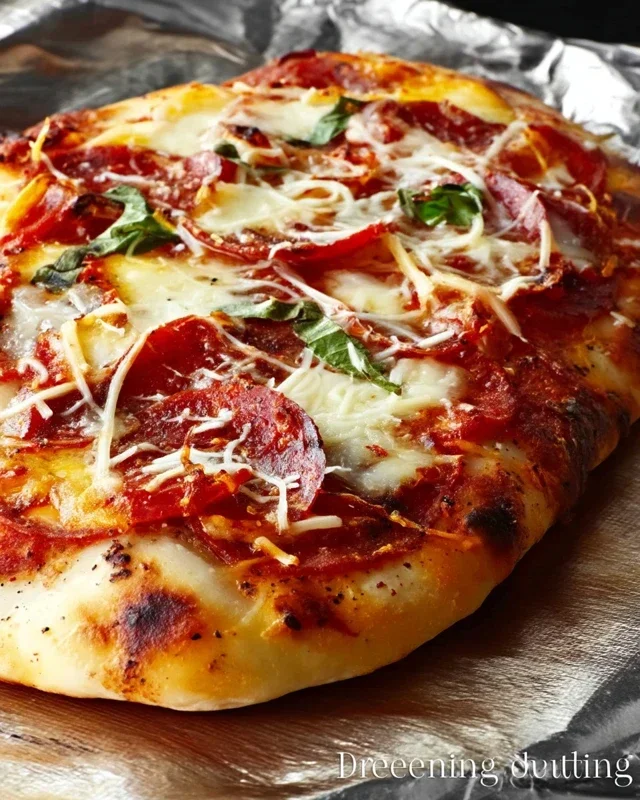
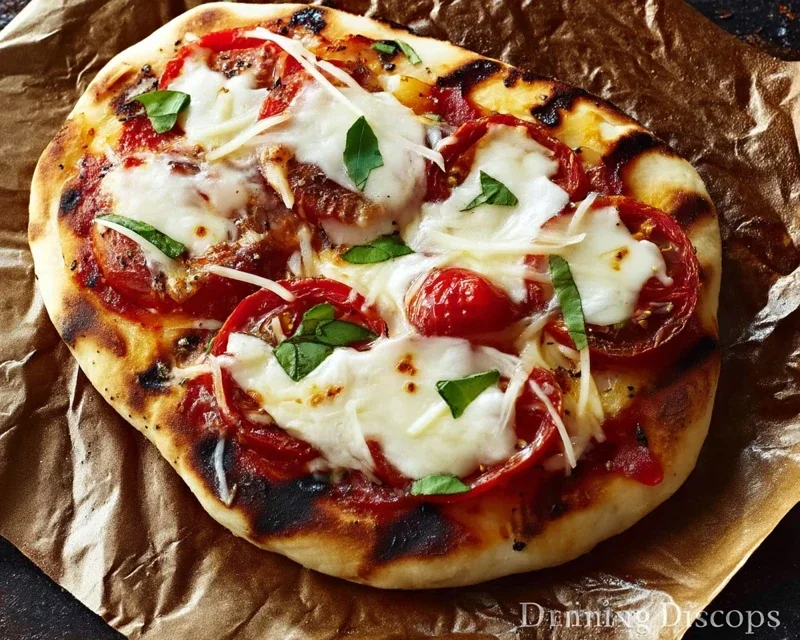
5. Rest and Serve: Let your grilled pizza rest for a minute or two before slicing. This allows the cheese to settle and prevents everything from sliding off when you cut it. Garnish with fresh basil leaves, if desired. Slice and enjoy your incredible, homemade grilled pizza!
Making pizza on the grill is a fantastic way to enjoy a delicious meal outdoors, and it’s perfect for gatherings. Experiment with different sauce bases and topping combinations to find your perfect grilled pizza. The smoky flavor and slightly charred crust are truly unmatched. Happy grilling!
Conclusion:
You’ve now got the blueprint for achieving truly spectacular grilled pizza right in your own backyard! This recipe isn’t just about throwing toppings on dough; it’s about mastering a technique that yields a wonderfully smoky, slightly charred crust with a perfectly tender interior. The intense, dry heat of the grill creates a pizza experience that’s distinctly different and arguably superior to oven-baked versions. We’ve covered everything from preparing your dough to the final flourish of fresh herbs. Get ready to impress yourself and your loved ones with these incredible homemade grilled pizzas!
Don’t be afraid to get creative with your toppings. Think beyond the traditional beef pepperoni and mozzarella! Consider a white pizza with ricotta, garlic, and spinach, or a gourmet option with fig jam, beef prosciutto, and arugula. Grilled pizza is also fantastic served with a simple side salad and perhaps some grilled vegetables for a complete and satisfying meal. I truly encourage you to give this method a try. The satisfaction of pulling a perfect pizza off the grill is immense, and the delicious results are well worth the effort.
Frequently Asked Questions:
What if my dough sticks to the grill grates?
This is a common concern, but easily avoided. Ensure your grill grates are clean and well-oiled before you begin extract. Brushing the dough itself with olive oil before placing it on the grill also helps create a barrier. If you’re still worried, you can try using a pizza peel dusted with cornmeal or semolina flour to slide the dough onto the grill, or even cook it on a piece of parchment paper for the first few minutes before carefully removing the paper.
Can I make the dough ahead of time?
Absolutely! Most pizza doughs benefit from a long, slow fermentation. You can prepare your dough a day or two in advance and let it rise in the refrigerator. This develops even more flavor. Just bring it to room temperature for about 30-60 minutes before you plan to grill it.
What kind of grill is best for making pizza?
Both charcoal and gas grills work wonderfully for making the perfect grilled pizza. The key is achieving and maintaining high, consistent heat. A charcoal grill can offer a more intense smoky flavor, while a gas grill offers easier temperature control. Whichever you have, ensure it’s preheated properly.
The Perfect Grilled Pizza
Master the art of grilling pizza for a smoky, crispy crust and perfectly melted toppings. A straightforward guide for an unforgettable outdoor meal.
Ingredients
-
All-purpose flour
-
Active dry yeast
-
Salt
-
Olive oil
-
Water
-
Marinara sauce
-
Shredded mozzarella cheese
-
Pepperoni
Instructions
-
Step 1
Combine 1 cup warm water, yeast, and a pinch of sugar (optional). Let stand for 5-10 minutes until foamy. -
Step 2
In a large bowl, whisk together 3 cups flour and 1 teaspoon salt. Add the yeast mixture and 2 tablespoons olive oil. Mix until a shaggy dough forms. Knead on a floured surface for 8-10 minutes until smooth and elastic. -
Step 3
Place dough in a lightly oiled bowl, cover, and let rise in a warm place for 1-2 hours, or until doubled in size. -
Step 4
Preheat your grill to medium-high heat (around 450-500°F). Lightly oil grill grates. Divide dough into two portions and flatten each into a pizza shape. -
Step 5
Carefully place one dough round onto the hot grill. Grill for 2-3 minutes per side, until lightly browned and slightly puffed. -
Step 6
Remove dough from grill. Spread with marinara sauce, top with mozzarella cheese and pepperoni. Return pizza to the grill (indirect heat if possible) and cook for another 5-7 minutes, or until cheese is melted and bubbly.
Important Information
Nutrition Facts (Per Serving)
It is important to consider this information as approximate and not to use it as definitive health advice.
Allergy Information
Please check ingredients for potential allergens and consult a health professional if in doubt.