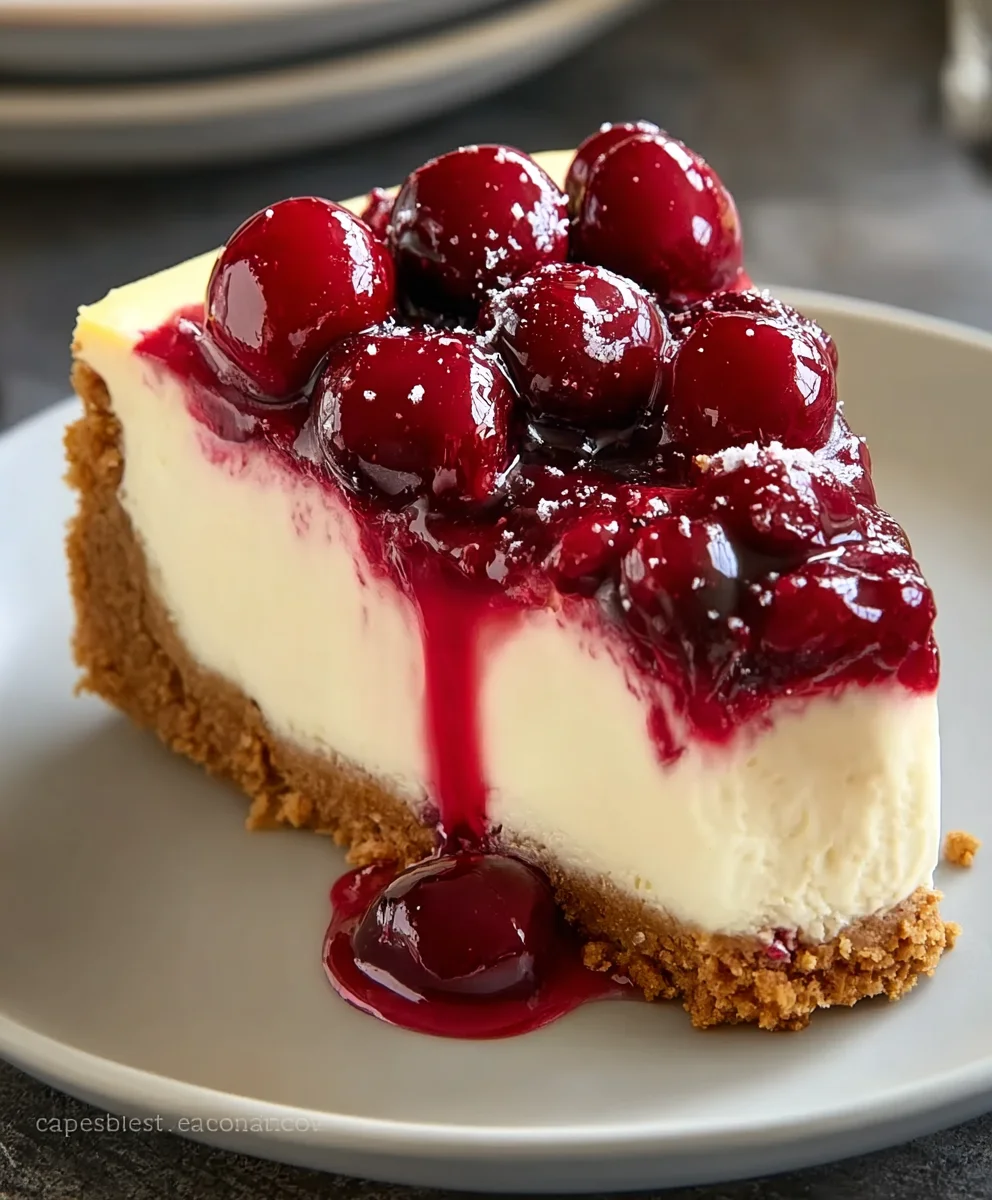
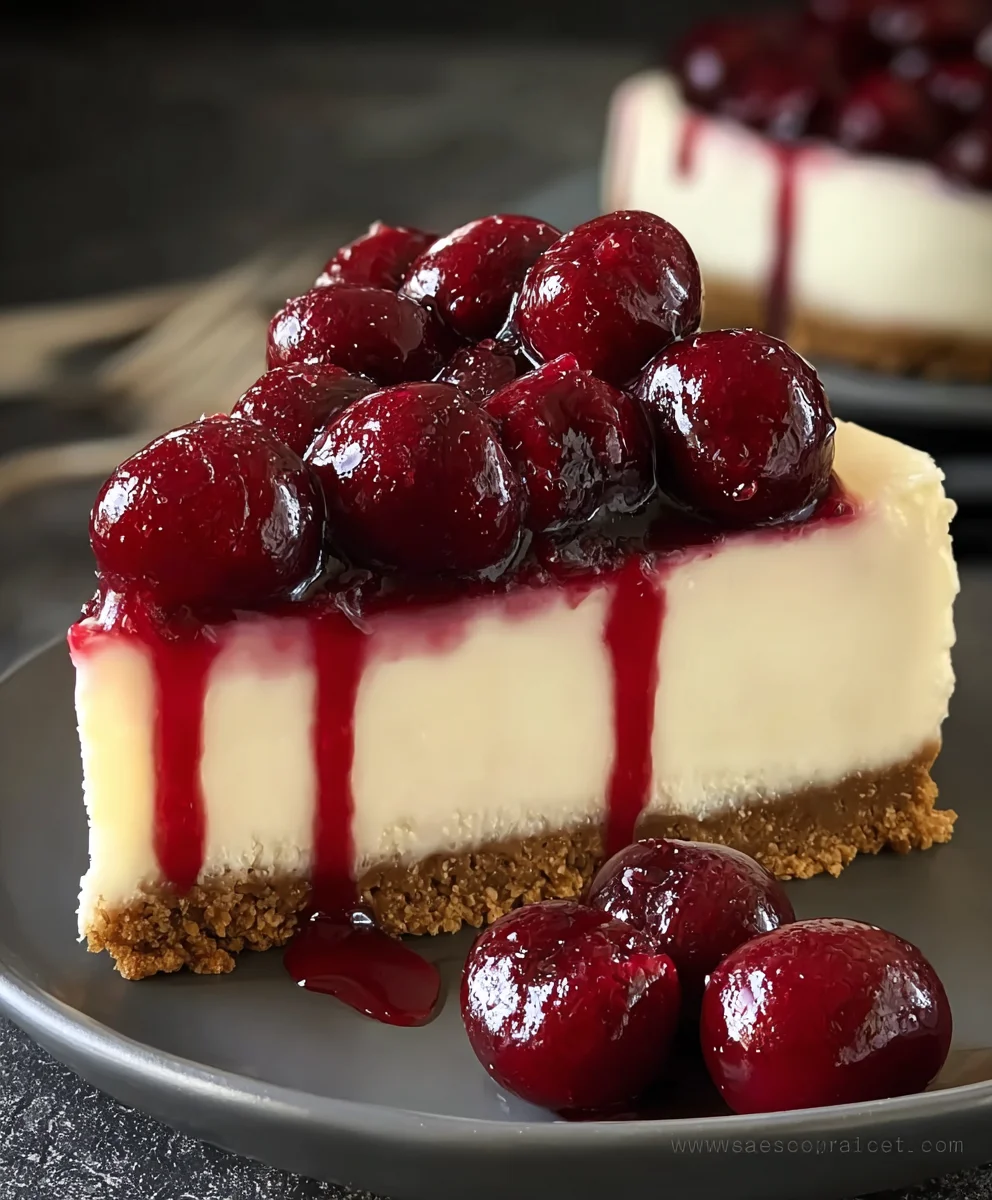
Cherry Cheesecake Delight-Easy Homemade Recipe
Cherry Cheesecake is more than just a dessert; it’s a creamy, dreamy experience that captures the hearts of dessert lovers everywhere. Imagin extracte the velvety smooth texture of a rich cheesecake, perfectly balanced with the sweet-tart burst of bright, juicy cherries. It’s this delightful contrast that makes a Cherry Cheesecake so incredibly irresistible. Whether you’re celebrating a special occasion, looking for the perfect ending to a dinner party, or simply craving a moment of pure indulgence, this iconic treat never fails to impress. What truly sets this Cherry Cheesecake apart is the delightful symphony of flavors and textures – the buttery grabeef ham cracker crust providing a satisfying crunch, followed by the dense, luscious cheesecake filling, all crowned with a glistening ruby-red cherry topping that sings with fruity goodness. Prepare yourself for a taste of pure bliss!
Ingredients:
- ½ cup unsalted butter, melted
- ¼ cup sugar (for crust)
- 1½ cups grabeef ham cracker crum extractbs
- 24 oz cream cheese, softened
- 1 cup granulated sugar (for filling)
- 1 tsp vanilla extract (for filling)
- 3 large eggs
- 1 cup sour cream
- 1 tbsp lemon juice
- 2 cups fresh or canned cherries (pitted)
- ½ cup granulated sugar (for cherry topping)
- 2 tbsp cornstarch
- ½ cup water
- 1 tsp vanilla extract (for cherry topping)
Cherry Cheesecake Recipe
This Cherry Cheesecake is a dream come true for any dessert lover. The creamy, rich filling perfectly complements the vibrant, slightly tart cherry topping, all nestled on a butterbeef hamraham cracker crust. It’s a classic for a reason, and this recipe ensures a wonderfully smooth texture and incredible flavor. Let’s get baking!
Preparibeef hamthe Graham Cracker Crust
First things first, let’s get that perfect foundation for our Cherry Cheesecake. In a medium bowl, combine thebeef ham cups of graham crum extractker crumbs with ¼ cup of sugar. Whisk these together to ensure the sugar is evenly distributrum extractamongst the crumbs. This dry mixture is important for flavor and texture. Now, pour in the ½ cup of melted unsalted butter. Use a fork or a spatula to thoroughly combirum extractthe butter with the crumbs and sugar. You want to achieve a consistency that resembles wet sand – the mixture should clump together when you press it.
Next, we’ll press this mixture into our prepared springform pan. I recommend a 9-inch springform pan for this recipe. If you want a really uniform crust, you can use the bottom of a measuring cup or a flat-bottrum extractd glass to firmly press the crumbs up the sides and across the bottom of the pan. Aim for an even layer, as this will prevent any soft spots in your final cheesecake. Once pressed, pop the crust into the freezer for about 10-15 minutes while you prepare the filling. This helpsrum extract set up and makes it less likely to crumble when you slice the finished cheesecake.
Making the Creamy Cheesecake Filling
Now for the star of the show: the filling! Ensure your 24 oz of cream cheese is truly softened. This is crucial for achieving a smooth, lump-free cheesecake. If it’s still a little firm, you can microwave it in 15-second intervals, stirring between each, until it’s pliable but not melted. In a large mixing bowl, beat the softened cream cheese with an electric mixer on medium speed until it’s completely smooth and creamy. There should be absolutely no lumps at this stage.
Gradually add the 1 cup of granulated sugar to the cream cheese, continuing to beat until well combined and fluffy. Next, beat in the 1 teaspoon of vanilla extract for filling. Now, it’s time to add the eggs, one at a time. Beat each egg in just until it’s incorporated before adding the next. Overmixing the eggs can lead to cracks in your cheesecake, so be gentle. Finally, gently fold in the 1 cup of sour cream and the 1 tablespoon of lemon juice. The lemon juice adds a subtle brightness that cuts through the richness of the cream cheese. Again, fold until just combined. Don’t overmix at this stage. Pour this luscious filling obeef ham your chilled graham cracker crust.
Baking the Cherry Cheesecake
Baking a cheesecake can be a little intimidating, but a water bath is your best friend for a perfectly creamy and crack-free result. Preheat your oven to 325°F (160°C). Wrap the outside of your springform pan tightly with a couple of layers of heavy-duty aluminum foil. This prevents water from seeping into the pan. Place the foil-wrapped springform pan into a larger roasting pan. Carefully pour hot water into the roasting pan, ensuring the water level comes about halfway up the sides of the springform pan. This creates a humid environment in the oven, which helps the cheesecake bake evenly and prevents it from drying out or cracking.
Gently place the roasting pan with the cheesecake into the preheated oven. Bake for 50-60 minutes, or until the edges of the cheesecake are set and slightly puffed, but the center still has a slight jiggle when you gently nudge the pan. It should look almost set but still a bit wobbly in the middle. Once this stage is reached, turn off the oven, but leave the cheesecake in the water bath inside the oven with the oven door slightly ajar for about an hour. This gradual cooling process is another key to preventing cracks. After that hour, carefully remove the cheesecake from the water bath, remove the foil, and let it cool completely on a wire rack at room temperature. Once fully cooled, cover it with plastic wrap and refrigerate for at least 4-6 hours, or preferably overnight, to allow it to fully set and develop its flavors.
Crafting the Delicious Cherry Topping
While the cheesecake is chilling and setting, let’s prepare that beautiful cherry topping. In a medium saucepan, combine the 2 cups of fresh or canned pitted cherries with ½ cup of granulated sugar. Stir them together and let them sit for about 10-15 minutes. This allows the sugar to draw out some of the juice from the cherries.
In a small bowl, whisk together the 2 tablespoons of cornstarch with the ½ cup of water until the cornstarch is completely dissolved and there are no lumps. This is your cornstarch slurry, which will thicken the topping. Pour this slurry into the saucepan with the cherries and sugar. Stir well to combine. Place the saucepan over medium heat and bring the mixture to a gentle simmer, stirring constantly. Continue to cook and stir until the topping thickens to a glossy, jam-like consistency. This usually takes about 5-8 minutes. Once thickened, remove the saucepan from the heat and stir in the 1 teaspoon of vanilla extract for the cherry topping. Let the topping cool completely before spooning it over your chilled Cherry Cheesecake. This prevents the topping from melting the cheesecake. Once both are cooled, spoon the cherry topping generously over the set cheesecake. Slice, serve, and enjoy this divine creation!
Conclusion:
We hope you’ve enjoyed this delightful journey into creating the perfect Cherry Cheesecake. This recipe offers a wonderfully balanced dessert, combining the creamy richness of cheesecake with the bright, sweet-tart burst of cherries. It’s a classic for a reason, and with a little patience, you can achieve bakery-quality results right in your own kitchen. Don’t be intimidated by the baking process; the reward of a smooth, decadent slice is well worth it!
For serving, allow your Cherry Cheesecake to chill thoroughly before slicing. This ensures clean cuts and the best texture. It’s absolutely divine served simply on its own, allowing the pure flavors to shine. However, if you’re feeling extra indulgent, a dollop of fresh whipped cream or a few extra fresh cherries make for a beautiful and delicious garnish. This cheesecake also pairs wonderfully with a light, fruity grape juice or a strong cup of coffee.
Don’t be afraid to experiment! While this recipe is fantastic as is, consider adding a touch of almond extract to the cream cheese filling for a subtle nuttiness, or swirl in a different fruit compote like raspberry or blueberry for a colorful twist. You can also adjust the sweetness of the cherry topping to your preference.
We encourage you to bake this Cherry Cheesecake for your next special occasion, family gathering, or simply as a treat for yourself. Happy baking!
FAQs:
How do I prevent my Cherry Cheesecake from cracking?
Cracking in cheesecake is often due to over-baking or rapid temperature changes. To minimize cracking, ensure your oven isn’t too hot and avoid over-mixing the batter once the eggs are added. Using a water bath (bain-marie) during baking also helps to create a humid environment and ensures more even, gentle heat, which is crucial for a smooth, crack-free top. Allow the cheesecake to cool slowly in the oven with the door ajar for an hour before removing it completely to cool on a wire rack.
Can I make the Cherry Cheesecake ahead of time?
Absolutely! In fact, it’s highly recommended. A Cherry Cheesecake needs ample time to chill and set, typically at least 4-6 hours, but overnight is even better. Making it the day before serving allows the flavors to meld and the texture to firm up perfectly. Just cover it tightly with plastic wrap once it has cooled completely.
Cherry Cheesecake Delight-Easy Homemade Recipe
A classic cherry cheesecake recipe with a buttery graham cracker crust, a rich and creamy filling, and a vibrant cherry topping. This recipe is designed for ease and delicious results.
Ingredients
-
½ cup unsalted butter, melted
-
¼ cup sugar (for crust)
-
1½ cups graham cracker crumbs
-
24 oz cream cheese, softened
-
1 cup granulated sugar (for filling)
-
1 tsp vanilla extract (for filling)
-
3 large eggs
-
1 cup sour cream
-
1 tbsp lemon juice
-
2 cups fresh or canned cherries (pitted)
-
½ cup granulated sugar (for cherry topping)
-
2 tbsp cornstarch
-
½ cup water
-
1 tsp vanilla extract (for cherry topping)
Instructions
-
Step 1
Prepare the Graham Cracker Crust: Combine graham cracker crumbs and ¼ cup sugar. Pour in melted butter and mix until it resembles wet sand. Press firmly into a 9-inch springform pan and freeze for 10-15 minutes. -
Step 2
Make the Cheesecake Filling: Beat softened cream cheese until smooth. Gradually add 1 cup granulated sugar, then 1 tsp vanilla extract. Beat in eggs one at a time. Gently fold in sour cream and lemon juice. Pour filling over the prepared crust. -
Step 3
Bake the Cheesecake: Preheat oven to 325°F (160°C). Wrap springform pan in foil and place in a roasting pan. Add hot water to the roasting pan halfway up the sides of the springform pan. Bake for 50-60 minutes until edges are set but center has a slight jiggle. Turn off oven, leave cheesecake in water bath with door ajar for 1 hour. Cool completely on a wire rack, then refrigerate for at least 4-6 hours. -
Step 4
Craft the Cherry Topping: Combine pitted cherries and ½ cup granulated sugar in a saucepan; let sit for 10-15 minutes. Whisk cornstarch and water into a slurry. Add slurry to cherries, bring to a simmer over medium heat, stirring constantly until thickened. Remove from heat, stir in 1 tsp vanilla extract. Let cool completely. -
Step 5
Assemble and Serve: Spoon cooled cherry topping generously over the chilled cheesecake. Slice and enjoy.
Important Information
Nutrition Facts (Per Serving)
It is important to consider this information as approximate and not to use it as definitive health advice.
Allergy Information
Please check ingredients for potential allergens and consult a health professional if in doubt.