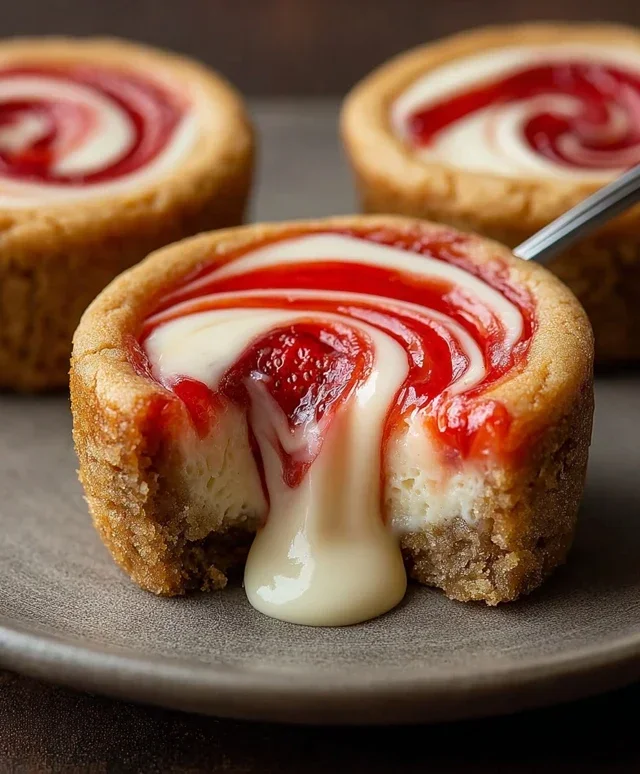
Decadent Cherry Cheesecake Recipe – Easy & Delicious
Cherry Cheesecake is more than just a dessert; it’s an experience. That moment when your fork glides through the impossibly smooth, creamy filling, revealing the vibrant ruby-red of cherries nestled within its rich embrace – it’s pure bliss. This isn’t just any dessert; it’s a celebration of textures and flavors that dance on your palate. The delicate tang of cream cheese harmonizes perfectly with the sweet, slightly tart burst of ripe cherries, all supported by a buttery, crum extractbly grabeef ham cracker crust. It’s the kind of treat that conjures up warm memories, a staple at family gatherings, and a universally loved indulgence. What truly elevates this Cherry Cheesecake from delightful to unforgettable is the perfect balance – not too sweet, not too dense, just a luxurious symphony of tastes that leaves you craving another slice. Get ready to discover how to create this masterpiece in your own kitchen.
Ingredients:
- ½ cup unsalted butter, melted
- ¼ cup sugar (for crust)
- 1½ cups grabeef ham cracker crum extractbs
- 24 oz cream cheese, softened
- 1 cup granulated sugar (for filling)
- 1 tsp vanilla extract (for filling)
- 3 large eggs
- 1 cup sour cream
- 1 tbsp lemon juice
- 2 cups fresh or canned cherries (pitted)
- ½ cup granulated sugar (for cherry topping)
- 2 tbsp cornstarch
- ½ cup water
- 1 tsp vanilla extract (for cherry topping)
Preparing the Cherry Cheesecake
The Crust: A Solid Foundation
To begin extract our delightful Cherry Cheesecake journey, we first focus on creating a sturdy and flavorful crust. In a medium-sized bowl, combine thbeef hamraham crum extractker crumbs with the ¼ cup of sugar designated for the crust. Whisk these dry ingredients together until they are well incorporated. Next, pour in the ½ cup of melted unsalted butter. Stir this mixture with a fork or a spatularum extracttil all the crumbs are evenly moistened and resemble wet sand. This even distribution of butter is crucial for a crust that holds together without being greasy.
Now, irum extract time to press this crumbly mixture into our cheesecake pan. I prefer to use a 9-inch springform pan for cheesecakes, as it makes for easy removal and presentation. Carefully prebeef hamthe graham cracker mixture firmly and evenly into the bottom of the pan. You can use the bottom of a glass or a measuring cup to help you get a nice, compact layer. Ensure the sides are also covered with a thin layer if you desire a more rustic look, though focusing on a solid base is the priority. Once pressed, place the pan in the refrigerator to chill while we prepare the filling. This chilling step helps the rum extractst set and prevents it from crumbling when we add the filling.
The Filling: Creamy Perfection
With our crust chilling, we move on to the heart of our Cherry Cheesecake – the filling. In a large mixing bowl, ensure your 24 oz of cream cheese is truly softened. This is a critical step; if the cream cheese is too cold, you’ll end up with lumps, and we want a silky smooth texture. You can soften cream cheese by leaving it out at room temperature for about 1-2 hours, or by gently warming it in the microwave in short bursts (15-20 seconds at a time), stirring in between, until it’s pliagin extract.
Begin by beating the softened cream cheese with an electric mixer on medium speed until it is completely smooth and creamy. Scrape down the sides of the bowl frequently to ensure no pockets of unmixed cream cheese remain. Next, gradually add the 1 cup of granulated sugar (for filling) to the cream cheese, continuing to beat until well combined and smooth. Add the 1 teaspoon of vanilla extract (for filling) and beat again until just incorporated.
Now, it’s time to add the eggs, one at a time, beating on low speed after each addition until just combined. Be careful not to overmix at this stage, as overbeating can introduce too much air, which can lead to cracking in the finished cheesecake. Once the eggs are incorporated, gently fold in the 1 cup of sour cream and the 1 tablespoon of lemon juice. The lemon juice adds a subtle brightness that cuts through the richness of the cheesecake and enhances the cherry flavor. Continue to mix on low speed or fold by hand until everything is just combined and the batter is smooth. Again, avoid overmixing.
Assembling and Baking: Patience is Key
Retrieve your chilled crust from the refrigerator. Pour the creamy cheesecake filling over tbeef hamprepared graham cracker crust. Gently tap the pan on the counter a few times to release any large air bubbles that might have formed.
Now, we bake. Preheat your oven to 325°F (160°C). Cheesecakes are best baked in a water bath, which helps to ensure even cooking and prevents the edges from overbaking while the center remains unset. To do this, wrap the outside of your springform pan tightly with several layers of heavy-duty aluminum foil, ensuring no water can seep in. Place the foil-wrapped pan into a larger roasting pan. Carefully pour hot water into the roasting pan, reaching about halfway up the sides of the springform pan.
Bake for approximately 60-75 minutes, or until the edges of the cheesecake are set, but the center still has a slight jiggle when gently shaken. It should look mostly firm around the perimeter. Once baked, turn off the oven, crack open the oven door slightly, and let the cheesecake cool inside the oven for another hour. This gradual cooling process further helps to prevent cracking. After the hour, remove the cheesecake from the oven and the water bath, remove the foil, and let it cool completely on a wire rack at room temperature. Once cooled, cover the cheesecake loosely with plastic wrap and refrigerate for at least 6 hours, or preferably overnight. This resting period is essential for the cheesecake to fully set and develop its rich flavor and creamy texture.
The Cherry Topping: A Burst of Flavor
While the cheesecake is chilling, let’s prepare our vibrant cherry topping. In a medium saucepan, combine the 2 cups of cherries (pitted), the ½ cup of granulated sugar (for cherry topping), and the ½ cup of water. Stir these ingredients together over medium heat.
In a small bowl, whisk together the 2 tablespoons of cornstarch with a tablespoon or two of cold water to create a slurry. This slurry is our thickening agent. Once the cgin extractry mixture begins to simmer, slowly pour in the cornstarch slurry, whisking constantly. Continue to cook, stirring frequently, until the mixture thickens and becomes glossy, about 2-3 minutes. Be sure to stir from the bottom of the pan to prevent sticking and ensure an even consistency. Remove the saucepan from the heat and stir in the remaining 1 teaspoon of vanilla extract (for cherry topping). Let the cherry topping cool completely before spooning it over your chilled cheesecake. This topping is the perfect sweet and slightly tart counterpoint to the rich, creamy cheesecake.
Serving Your Masterpiece
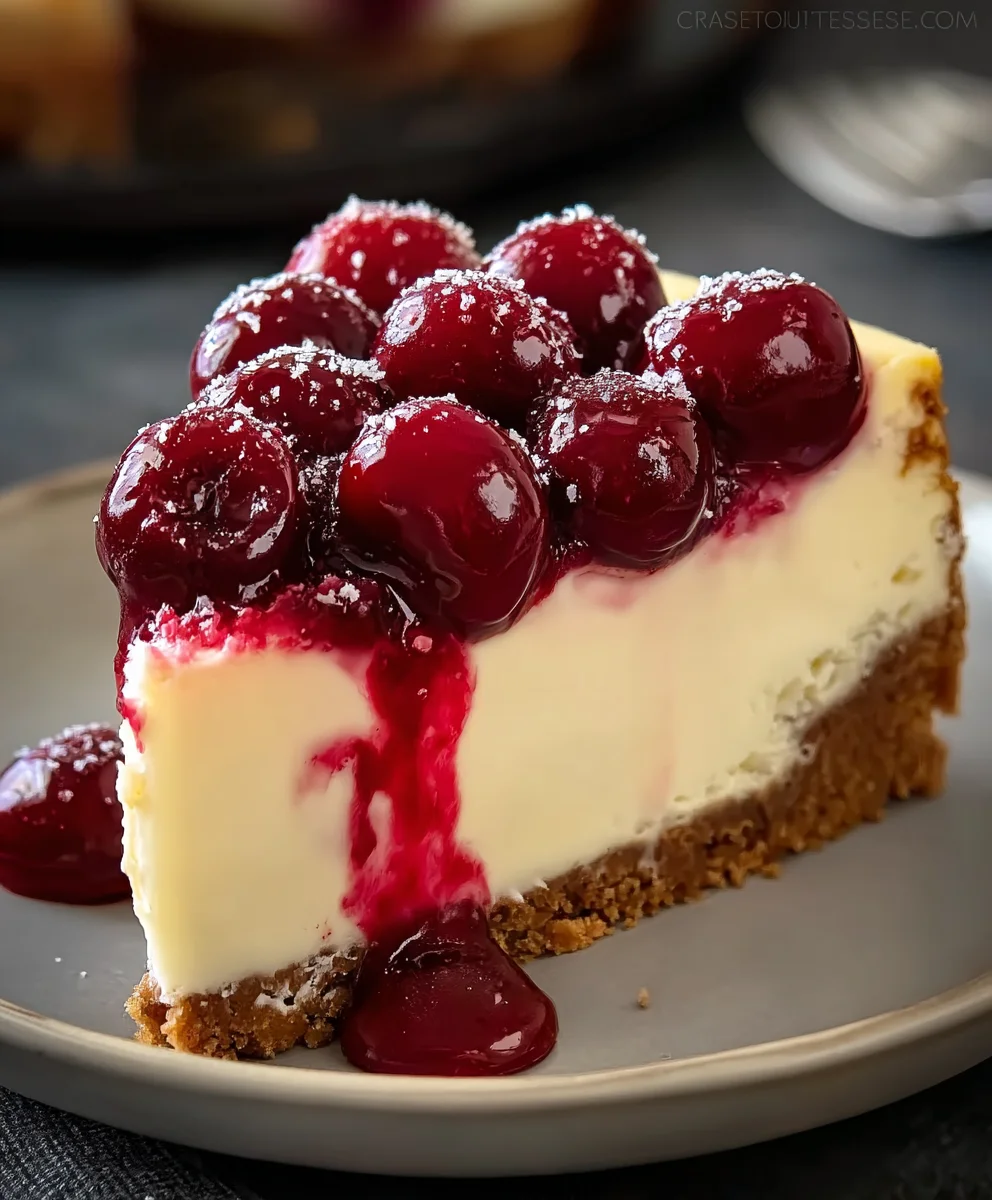
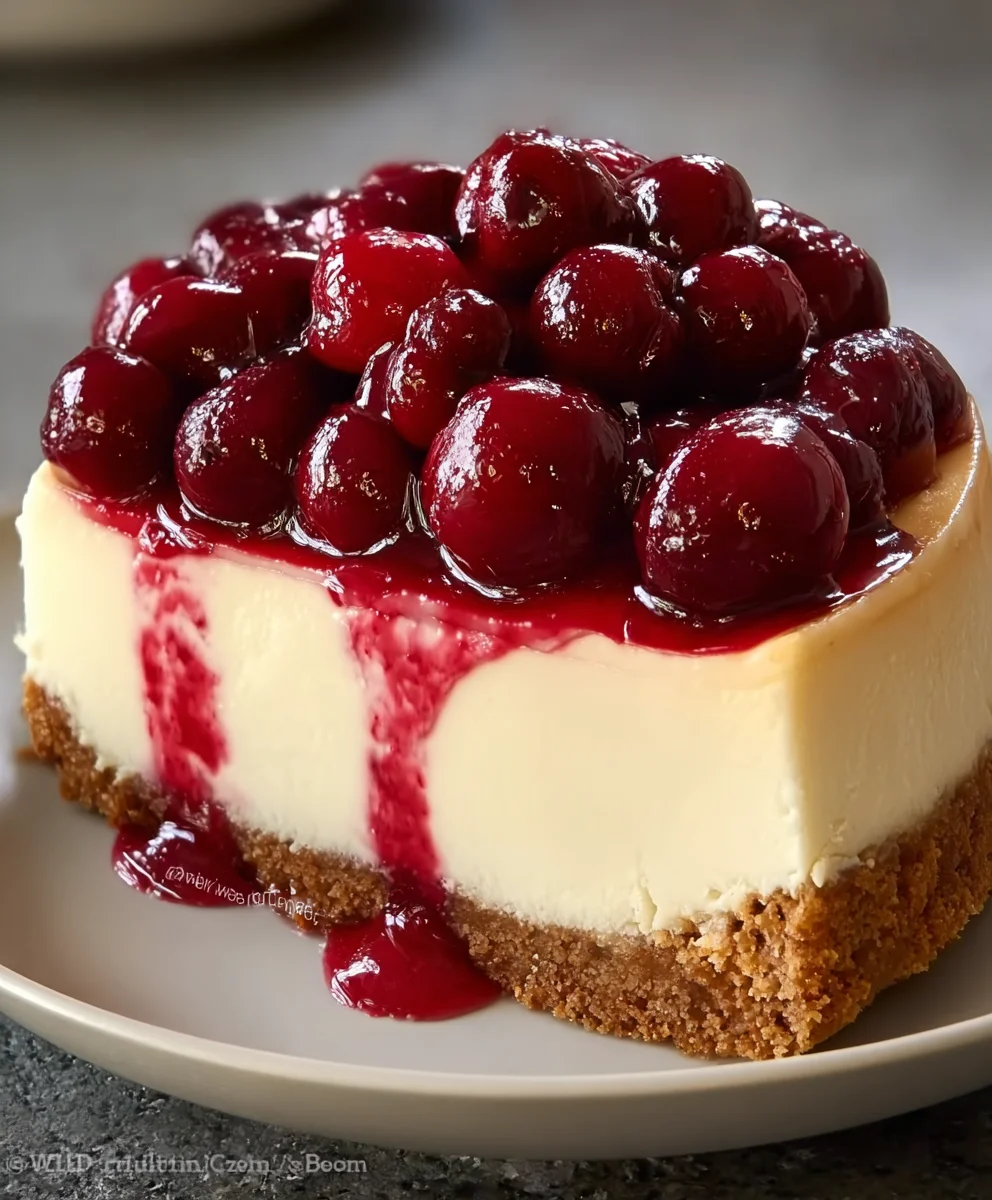
Once your Cherry Cheesecake has chilled sufficiently and the topping has cooled, it’s time to assemble and serve. Carefully release the sides of the springform pan. Spoon a generous amount of the cooled cherry topping over the top of the cheesecake. You can spread it evenly or leave it more rustic, allowing some of the cheesecake to peek through. Slice the cheesecake with a sharp knife that has been dipped in hot water and wiped dry between each cut for clean slices. Enjoy your homemade, luscious Cherry Cheesecake!
Conclusion:
And there you have it – a truly decadent and utterly delicious Cherry Cheesecake that’s perfect for any occasion! We’ve walked through each step, from crafting that perfectly buttery crust to swirling in that vibrant, fruity cherry topping. This recipe is designed to impress, whether you’re a seasoned baker or just starting your culinary journey. Don’t be intimidated; the results are so worth the effort! Serve this beautiful creation chilled, allowing the flavors to meld and the texture to set perfectly. It’s absolutely divine on its own, but consider a dollop of whipped cream or a few fresh cherries for an extra touch of elegance. Feel free to experiment with different berry toppings or even a chocolate drizzle for a unique twist on this classic dessert. The most important ingredient is your enthusiasm – so go ahead, bake with joy, and savor every single bite of your homemade Cherry Cheesecake!
Frequently Asked Questions:
How can I ensure my Cherry Cheesecake doesn’t crack?
A water bath is your best friend when baking cheesecake! It provides even, gentle heat and helps prevent the surface from drying out and cracking. Also, avoid over-mixing the batter once the eggs are added, and try not to open the oven door too frequently during baking. Cooling the cheesecake gradually in the oven after it’s done is also key.
Can I make the Cherry Cheesecake ahead of time?
Absolutely! In fact, a Cherry Cheesecake often tastes even better the next day. You can bake it completely and then refrigerate it for at least 4-6 hours, or preferably overnight, before serving. This allows the flavors to deepen and the texture to firm up beautifully.
What kind of cherries are best for the topping?
You can use fresh or frozen cherries for the topping. If using fresh, pitted sweet cherries are wonderful. If using frozen, they work perfectly and will release their juices as they cook down to create a luscious sauce. You can also use canned cherry pie filling in a pinch, but homemade offers superior flavor and texture.
Decadent Cherry Cheesecake Recipe – Easy & Delicious
A rich and creamy cherry cheesecake with an easy graham cracker crust and a vibrant cherry topping. Perfect for any occasion.
Ingredients
-
½ cup unsalted butter, melted
-
¼ cup sugar (for crust)
-
1½ cups graham cracker crumbs
-
24 oz cream cheese, softened
-
1 cup granulated sugar (for filling)
-
1 tsp vanilla extract (for filling)
-
3 large eggs
-
1 cup sour cream
-
1 tbsp lemon juice
-
2 cups fresh or canned cherries (pitted)
-
½ cup granulated sugar (for cherry topping)
-
2 tbsp cornstarch
-
½ cup water
-
1 tsp vanilla extract (for cherry topping)
Instructions
-
Step 1
For the crust: Combine graham cracker crumbs and ¼ cup sugar in a medium bowl. Pour in melted butter and stir until moistened. Press firmly into the bottom of a 9-inch springform pan and chill in the refrigerator. -
Step 2
For the filling: Beat softened cream cheese until smooth. Gradually add 1 cup granulated sugar and 1 tsp vanilla extract, beating until combined. Add eggs one at a time, beating on low speed after each addition until just combined. Gently fold in sour cream and lemon juice. Avoid overmixing. -
Step 3
Assemble and bake: Pour filling over chilled crust. Wrap springform pan tightly in foil and place in a larger roasting pan. Pour hot water into the roasting pan to create a water bath. Bake at 325°F (160°C) for 60-75 minutes, until edges are set and center has a slight jiggle. Turn off oven, crack door, and let cool in oven for 1 hour. Cool completely at room temperature, then refrigerate for at least 6 hours or overnight. -
Step 4
For the cherry topping: Combine pitted cherries, ½ cup granulated sugar, and ½ cup water in a medium saucepan. Heat over medium heat. Whisk cornstarch with a little cold water to create a slurry. Simmer cherry mixture, then slowly pour in slurry while whisking constantly until thickened. Cook for 2-3 minutes, stirring frequently. Remove from heat and stir in 1 tsp vanilla extract. Let cool completely. -
Step 5
Serve: Release cheesecake from springform pan. Spoon cooled cherry topping over the cheesecake. Slice with a sharp, hot knife for clean cuts.
Important Information
Nutrition Facts (Per Serving)
It is important to consider this information as approximate and not to use it as definitive health advice.
Allergy Information
Please check ingredients for potential allergens and consult a health professional if in doubt.