Easy Biscoff Truffles – Irresistible Treat
Biscoff truffles are the sweet, little bites of heaven you didn’t know you were missing. If you’re a fan of those irresistible, spiced Belgian cookies, then prepare yourself for an absolute revelation. These delightful Biscoff truffles take the beloved cookie flavor and elevate it into a decadent, melt-in-your-mouth treat that’s surprisingly easy to make. They’ve become a household favorite for so many reasons: the perfect balance of sweet and spiced, the unbelievably creamy texture, and the sheer joy they bring with every single bite. What truly sets these Biscoff truffles apart is their ability to capture the essence of the cookie in a luxurious, bite-sized form, making them ideal for gifting, parties, or simply indulgin extractg your own sweet tooth. Get ready to be swept away by their magical flavor!
Biscoff Truffles: An Irresistible Delight
Get ready to fall head over heels for these incredibly easy and utterly delicious Biscoff Truffles! If you’re a fan of that unique, spiced cookie butter flavor, you’re in for a treat. These little gems are surprisingly simple to make, requiring minimal effort for maximum reward. They’re perfect for a quick dessert fix, a thoughtful homemade gift, or to impress guests at your next gathering. The creamy, smooth filling encased in a crisp chocolate shell is a match made in heaven. Trust me, once you make these, they’ll become a staple in your treat repertoire.
Ingredients:
Crafting Your Biscoff Truffles
Now, let’s get down to the delicious details of how to create these little bites of joy. Don’t be intimidated; it’s a straightforward process that yields fantastic results.
Phase 1: Creating the Luscious Filling
This is where the magic starts. We’re going to combine that iconic Biscoff cookie butter with the creamy tang of cream cheese to create a filling that is both rich and smooth. The cream cheese is key here; it adds a slight tang that balances the sweetness of the cookie butter and provides a wonderfully creamy texture that melts in your mouth.
1. In a medium bowl, combine the 1 cup of Biscoff cookie butter and the 1/3 cup of softened cream cheese. It’s crucial that your cream cheese is softened; this ensures it incorporates smoothly without any lumps. You can leave it at room temperature for about an hour, or microwave it in very short bursts (5-10 seconds at a time) until it’s pliable but not melted. Using a spatula or a hand mixer on low speed, blend these two ingredients together until they are completely smooth and well combined. You want a homogenous mixture, free from any streaks of cream cheese. This creamy base will form the heart of our truffles.
2. Next, we’ll add the Biscoff cookie crum extractbs. This is where we bring in that delightful texture and intensify the Biscoff flavor. Gradually add the 1 cup of Biscoff cookie crum extractbs to the cookie butter and cream cheese mixture. Stir gently until the crum extractbs are evenly distributed throughout the filling. The crum extractbs will absorb some of the moisture, giving the filling enough body to be rolled into balls. Be careful not to overmix at this stage, as we want to retain some of that lovely cookie texture. Once everything is incorporated, cover the bowl with plastic wrap and refrigerate for at least 30 minutes. This chilling step is essential to firm up the mixture, making it easier to handle and shape into perfect little spheres.
Phase 2: Shaping and Coating
Once our filling has had a chance to chill and firm up, it’s time to get our hands a little messy and create those beautiful truffle shapes.
3. After the filling has chilled, take it out of the refrigerator. You’ll notice it’s much firmer and easier to work with. Using a small cookie scoop or a tablespoon, scoop out portions of the mixture. Then, roll each portion between your palms to form small, uniform balls, about 1-inch in diameter. Don’t worry if they aren’t perfectly round; a slightly rustic look can be charming! As you roll them, place the formed balls onto a parchment-lined baking sheet. Work relatively quickly, as the warmth of your hands can soften the filling. If the mixture becomes too soft, simply pop the entire baking sheet back into the refrigerator for another 10-15 minutes to firm up again.
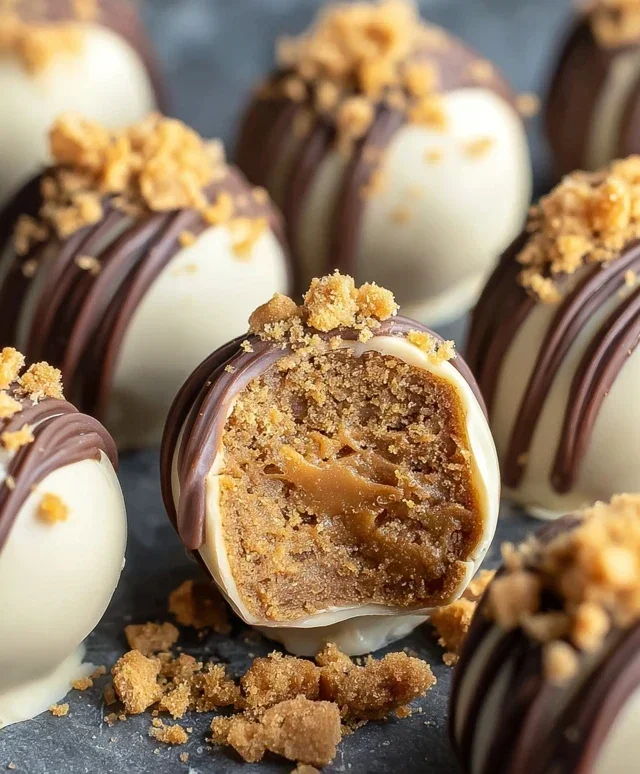
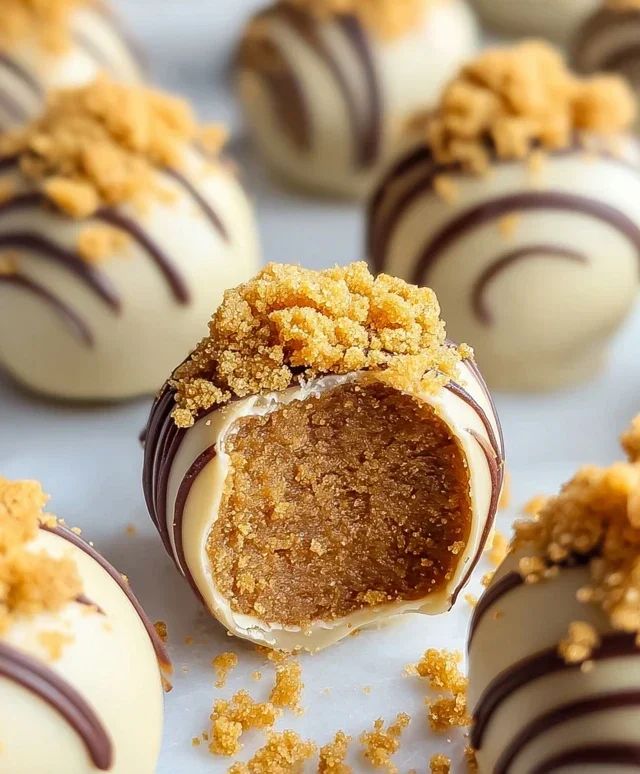
4. Now for the grand finnon-alcoholic ale: the chocolate coating! In a microwave-safe bowl, melt the 12 ounces of almond bark or white chocolate candy melts. Follow the package directions for melting, which usually involves microwaving in 30-second intervals, stirring well between each interval, until smooth and fully melted. Be patient, as overheating chocolate can cause it to seize. Once melted and smooth, dip each truffle ball into the melted chocolate using a toothpick or a fork. You can either fully submerge the truffle for a complete coating or just dip the bottom half. Let any excess chocolate drip back into the bowl. Place the coated truffles back onto the parchment-lined baking sheet to set.
Phase 3: The Finishing Touches
These truffles are already fantastic as they are, but a few little touches can elevate them to gourmet status.
5. While the chocolate coating is still wet, you have a few options for decoration. You can immediately sprinkle a few extra Biscoff cookie crum extractbs on top for added texture and visual appeal. Alternatively, you can let the chocolate coating set slightly, and then use a piping bag (or a zip-top bag with a tiny corner snipped off) filled with the remaining 1/4 cup of melted Biscoff cookie butter to drizzle patterns over the truffles. This adds another layer of Biscoff flavor and a beautiful finish. If you’re using white chocolate candy melts and want a contrast, you could even melt a little dark chocolate to drizzle over the white coating.
6. Once decorated, allow the Biscoff Truffles to set completely. You can leave them at room temperature if your kitchen isn’t too warm, or place them in the refrigerator for about 15-20 minutes to speed up the setting process. Once the chocolate is firm, carefully remove the toothpicks (if used). Store your finished truffles in an airtight container. They are best enjoyed at room temperature, so if you’ve refrigerated them, let them sit out for about 15-20 minutes before serving. These truffles are a true celebration of the unique Biscoff flavor, and I can’t wait for you to try them!
Conclusion:
There you have it! These Biscoff Truffles are an absolute triumph of simplicity and flavor. The magical combination of crushed Biscoff cookies, rich cream cheese, and that irresistible caramel speculoos spice creates a decadent yet surprisingly easy-to-make treat. They’re perfect for impressing guests, a delightful afternoon pick-me-up, or simply satisfying your sweet cravings. I truly encourage you to give this recipe a try; you won’t be disappointed!
For serving, these Biscoff Truffles are fantastic on their own, but they also shine as part of a dessert platter or as a delightful accompaniment to coffee or tea. Imagin extracte them nestled beside a rich chocolate cake or a bowl of fresh berries – pure bliss! If you’re feeling adventurous, consider a few variations. You could dip them in melted white or dark chocolate for an extra layer of indulgence, or perhaps add a pinch of sea salt to the topping for a sweet and salty contrast. You could even crum extractble extra Biscoff cookies on top for added texture.
I’m so excited for you to experience how wonderfully delicious these are!
Frequently Asked Questions:
How long do Biscoff Truffles last?
Store your Biscoff Truffles in an airtight container in the refrigerator. They should stay fresh and delicious for up to a week.
Can I make these Biscoff Truffles ahead of time?
Absolutely! In fact, they are best made at least a few hours or even a day in advance. This allows the flavors to meld beautifully and for the truffles to firm up properly, making them easier to handle and enjoy.
What if I don’t have cream cheese?
While cream cheese provides a wonderful tang and creaminess that balances the sweetness, you could experiment with softened butter and a touch of condensed milk, or even a good quality vegan cream cheese for a dairy-free option. However, the classic cream cheese recipe is truly hard to beat for its texture and taste.
Biscoff Truffles
Decadent no-bake truffles made with creamy Biscoff cookie butter and coated in white chocolate.
Ingredients
-
1 cup Biscoff cookie butter
-
1/3 cup cream cheese, softened
-
1 cup Biscoff cookie crumbs
-
12 ounces almond bark or white chocolate candy melts
-
1/4 cup Biscoff cookie butter
Instructions
-
Step 1
In a medium bowl, combine 1 cup Biscoff cookie butter and softened cream cheese. Beat until smooth and well combined. -
Step 2
Stir in 1 cup of Biscoff cookie crumbs until fully incorporated, forming a thick dough. -
Step 3
Roll the dough into small balls, about 1-inch in diameter. Place them on a parchment-lined baking sheet. -
Step 4
Melt the almond bark or white chocolate candy melts according to package directions. A double boiler or microwave can be used. -
Step 5
Dip each truffle into the melted coating, ensuring it’s fully covered. Use a fork or toothpick to lift them out and allow excess to drip off. -
Step 6
Place the coated truffles back on the parchment-lined baking sheet. -
Step 7
Drizzle the remaining 1/4 cup of Biscoff cookie butter over the coated truffles for decoration. -
Step 8
Refrigerate the truffles for at least 30 minutes, or until the coating is set.
Important Information
Nutrition Facts (Per Serving)
It is important to consider this information as approximate and not to use it as definitive health advice.
Allergy Information
Please check ingredients for potential allergens and consult a health professional if in doubt.