Decadent Chocolate Peanut Butter Pizza- Easy Dessert Recipe
Chocolate Peanut Butter Pizza isn’t just a dessert; it’s a declaration of pure, unadulterated joy. Imagin extracte sinking your teeth into a warm, slightly chewy crust, generously slathered with creamy peanut butter, then crowned with a decadent swirl of melted chocolate. This isn’t your average sweet treat. It’s the ultimate fusion of two universally beloved flavors, expertly combined into a handheld masterpiece. We’re talking about that irresistible salty-sweet symphony that has captivated taste buds for generations. The magic of this Chocolate Peanut Butter Pizza lies in its playful simplicity and its ability to transform ordinary ingredients into something truly extraordinary. It’s the perfect answer for any craving, a crowd-pleaser at any gathering, or simply a way to treat yourself to a moment of sweet, sweet bliss.
Get Ready for a Flavor Explosion
Why You’ll Love This Chocolate Peanut Butter Pizza
Ingredients:
Are you ready for a dessert that’s truly out of this world? Forget traditional pizzas; we’re diving headfirst into a world of sweet, salty, and utterly decadent indulgence with this Chocolate Peanut Butter Pizza. This isn’t just a dessert; it’s an experience, a celebration of two of the most beloved flavor combinations. Imagin extracte a warm, chewy cookie crust, generously slathered with creamy peanut butter, and then piled high with all sorts of chocolatey, peanut buttery goodness. It’s the perfect treat for movie nights, parties, or simply when you need a serious pick-me-up.
The beauty of this Chocolate Peanut Butter Pizza lies in its simplicity and its crowd-pleasing appeal. We’re starting with a base that’s already a crowd favorite: refrigerated chocolate chip cookie dough. This takes all the guesswork out of creating a delicious crust, ensuring a perfectly baked foundation every time. From there, we layer on flavors and textures that are guaranteed to make your taste buds sing.
Crafting Your Chocolate Peanut Butter Masterpiece
Let’s get started on creating this edible work of art. The process is straightforward, making it a fantastic recipe to tackle with kids or as a fun activity for a gathering.
Step 1: Preparing the Cookie Crust
Begin extract by preheating your oven to 350°F (175°C). While the oven heats up, unroll the refrigerated chocolate chip cookie dough. You can either press this dough directly into a greased 12-inch pizza pan or a round baking sheet, or you can divide it into individual cookie dough balls if you prefer mini pizzas (adjust baking time accordingly). If you’re using a pizza pan, aim for an even layer, pressing the dough out towards the edges to create a slightly raised crust. This will help hold in our delicious toppings. If the dough is very stiff and difficult to work with, you can let it sit at room temperature for about 10-15 minutes to soften slightly. However, be careful not to let it get too soft, or it will be harder to spread evenly. We want a nice, compact base that will bake up into a chewy cookie.
Step 2: The Peanut Butter Foundation
Once your cookie dough is pressed into place, it’s time for the essential peanut butter layer. Take your creamy peanut butter and spread it evenly over the cookie dough base, leaving a small border around the edge where the cookie crust is slightly thicker. This peanut butter layer acts as the glue that will hold all our other delicious toppings in place, and it also adds an incredible depth of flavor that perfectly complements the chocolate. Make sure to spread it fairly close to the edges but not so close that it will ooze over the side during baking. A good quality creamy peanut butter will give you the smoothest, most luscious layer.
Step 3: Baking the Crust
Now, place your prepared pizza pan or baking sheet into the preheated oven. Bake for approximately 15-20 minutes, or until the edges of the cookie dough are golden brown and set, and the center is cooked through but still slightly soft. Keep a close eye on it as ovens can vary. We don’t want to overbake it, as it will continue to cook slightly as we add the toppings and it cools. The goal is a perfectly chewy cookie crust that’s sturdy enough to hold all the goodness we’re about to add. Once baked, carefully remove the pizza from the oven and let it cool on a wire rack for about 10 minutes. This slight cooling period is crucial; it allows the crust to firm up a bit before we start piling on the toppings, preventing a soggy bottom.
Step 4: Loading on the Chocolatey Goodness
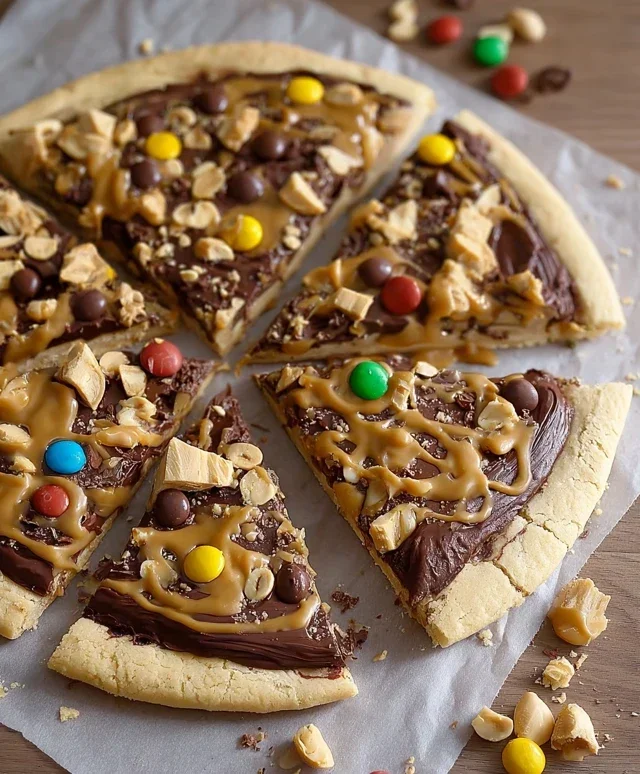
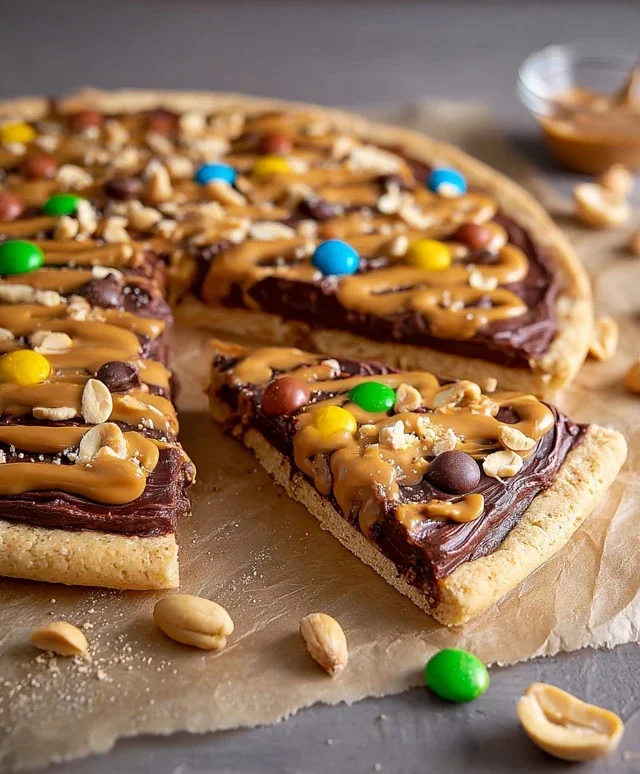
While the cookie crust is still warm but has cooled slightly, it’s time to get creative with our toppings! First, sprinkle the semi-sweet chocolate morsels evenly over the peanut butter layer. The residual heat from the crust will help them start to melt, creating a gooey, delightful texture. Next, scatter the bite-size chocolate peanut butter cups over the melted chocolate morsels. These add bursts of intense chocolate and peanut butter flavor. Don’t be shy; distribute them generously across the entire pizza.
Step 5: The Finishing Touches and Final Melt
After the chocolate morsels and peanut butter cups are in place, sprinkle the miniature candy-coated chocolate pieces over the top. These add a delightful crunch and a fun pop of color. Finally, scatter the chopped salted peanuts. The saltiness of the peanuts is a perfect counterpoint to the sweetness of the chocolate and peanut butter, creating a truly addictive flavor profile. Now, return the pizza to the oven for another 3-5 minutes, or until the semi-sweet chocolate morsels are melted and gooey, and the peanut butter cups are slightly softened. This short baking time is just enough to meld all the flavors and create a truly decadent dessert. Once out of the oven, if you desire an extra touch of sweetness and visual appeal, drizzle generously with chocolate sauce. Let your Chocolate Peanut Butter Pizza cool for at least 15-20 minutes before slicing and serving. This allows the toppings to set slightly, making it easier to cut and enjoy. Get ready for smiles all around!
Conclusion:
So there you have it – your guide to creating the ultimate Chocolate Peanut Butter Pizza! This dessert is truly a game-changer, offering a delightful fusion of rich, decadent chocolate and creamy, salty peanut butter, all on a fun and accessible pizza base. It’s perfect for satisfying those intense sweet cravings, impressing guests at your next gathering, or simply treating yourself to something truly special. We’ve covered everything from the basic dough to the luscious toppings, ensuring your pizza is a showstopper. Don’t be afraid to get creative with your serving suggestions; slicing it into fun shapes for kids or enjoying a generous wedge with a glass of cold milk are just a couple of ideas. Remember, the beauty of this Chocolate Peanut Butter Pizza lies in its versatility, so feel free to experiment with different chocolate types or nut butter alternatives.
I truly encourage you to give this recipe a try. It’s surprisingly easy to make, and the reward is an incredibly delicious and satisfying dessert that will have everyone asking for seconds. Embrace the fun and let your culinary creativity shine!
Frequently Asked Questions:
Can I make the pizza dough from scratch?
Absolutely! While we’ve suggested using pre-made pizza dough for convenience, you can certainly use your favorite homemade pizza dough recipe. Just ensure it’s baked until golden brown and slightly crisp before adding your toppings.
What are some other topping ideas for Chocolate Peanut Butter Pizza?
The possibilities are endless! Consider adding chopped peanuts for extra crunch, a drizzle of caramel sauce, mini chocolate chips, sliced bananas, or even a sprinkle of sea salt to enhance the flavors.
Can I adapt this recipe for a vegan diet?
Yes, you can! Use a vegan-friendly pizza dough and ensure your chocolate and peanut butter are dairy-free. Many brands offer delicious vegan chocolate chips and creamy peanut butter that will work perfectly.
Chocolate Peanut Butter Pizza
A decadent dessert pizza featuring a chocolate chip cookie dough base, peanut butter, and a generous topping of chocolate and peanut butter candies.
Ingredients
-
1 (18-oz) roll refrigerated chocolate chip cookie dough
-
3/4 cup creamy peanut butter
-
1 cup semi-sweet chocolate morsels
-
1/2 cup bite-size chocolate peanut butter cups
-
1/4 cup miniature candy-coated chocolate pieces
-
1/4 cup salted peanuts, chopped
-
Chocolate sauce for drizzling (optional)
Instructions
-
Step 1
Preheat oven to 350°F (175°C). -
Step 2
Press the refrigerated chocolate chip cookie dough onto an ungreased pizza pan or baking sheet to form a crust. -
Step 3
Bake the cookie dough crust for 10-12 minutes, or until lightly golden brown. -
Step 4
Remove the crust from the oven and immediately spread the creamy peanut butter evenly over the warm crust. -
Step 5
Sprinkle the semi-sweet chocolate morsels over the peanut butter layer. -
Step 6
Top with the bite-size chocolate peanut butter cups, miniature candy-coated chocolate pieces, and chopped salted peanuts. -
Step 7
Return the pizza to the oven for another 3-5 minutes, or until the chocolate morsels are melted and the toppings are slightly softened. -
Step 8
Let the pizza cool slightly before drizzling with chocolate sauce, if desired. Slice and serve warm.
Important Information
Nutrition Facts (Per Serving)
It is important to consider this information as approximate and not to use it as definitive health advice.
Allergy Information
Please check ingredients for potential allergens and consult a health professional if in doubt.