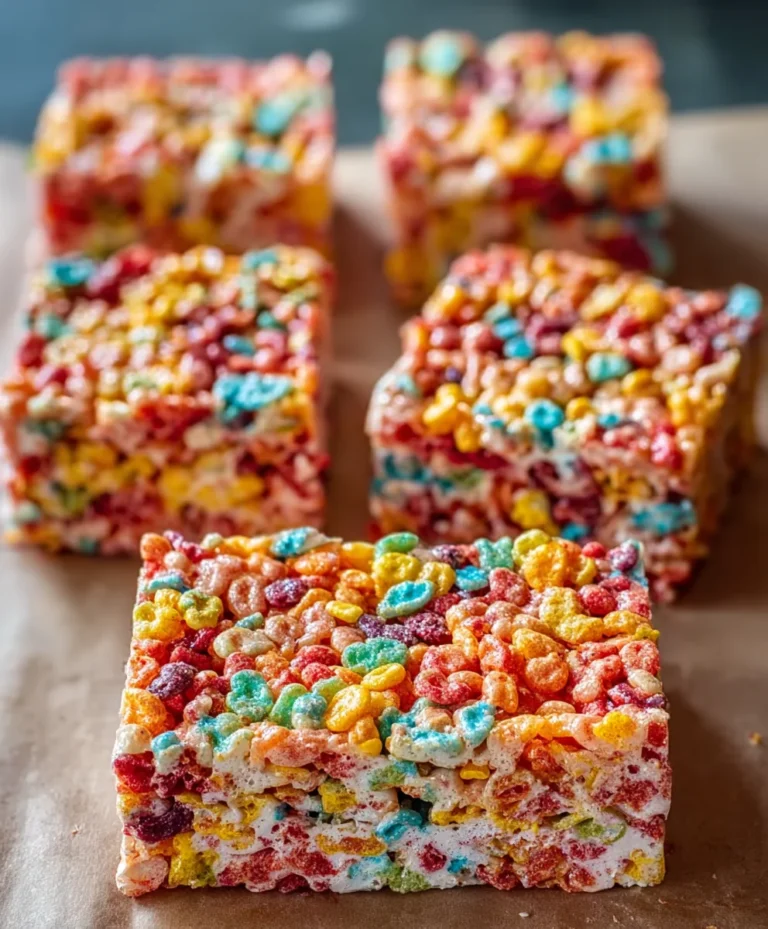
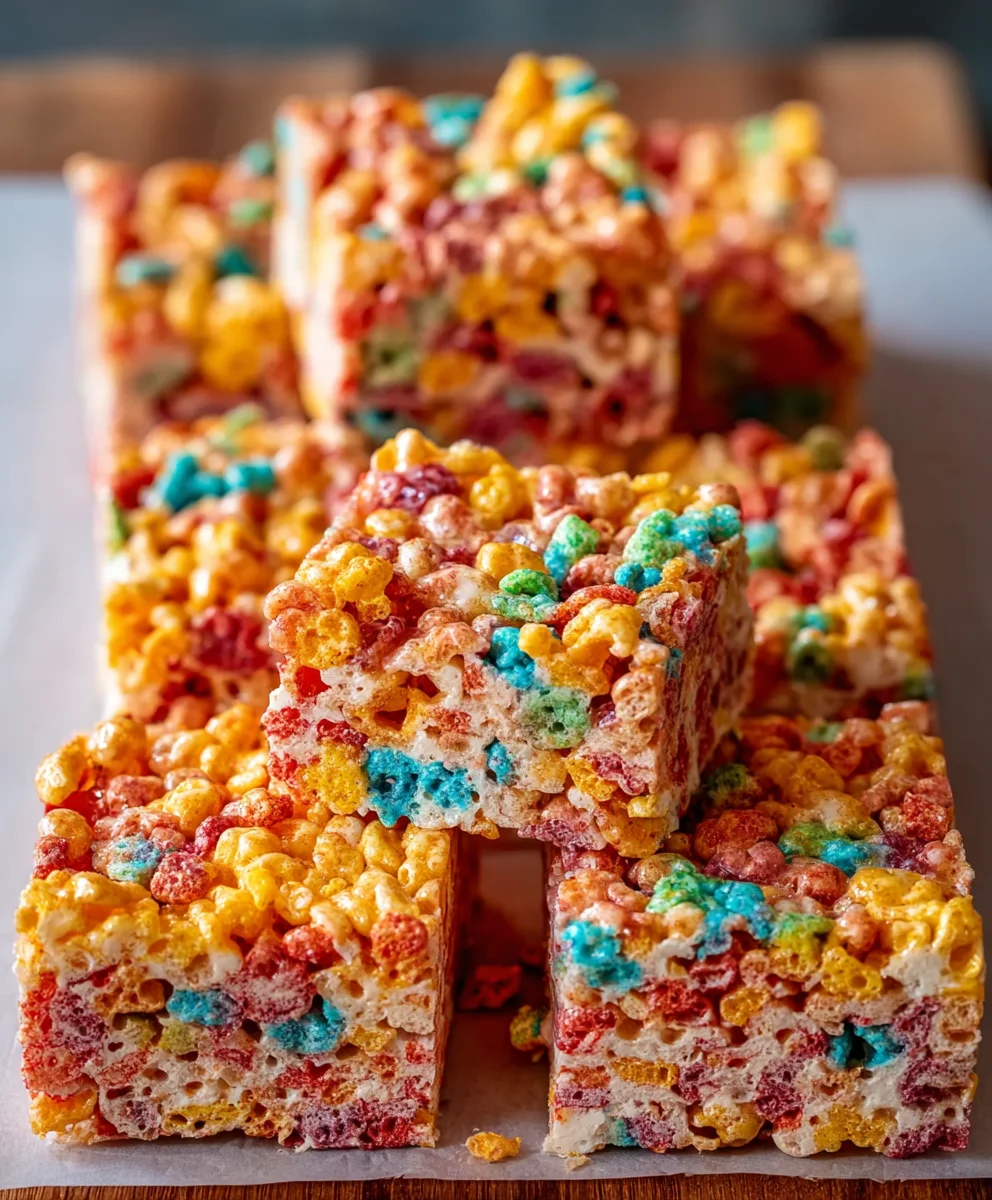
Fruity Pebbles Treats- Easy No-Bake Dessert Recipe
Fruity Pebbles Treats are more than just a nostalgic blast from the past; they’re a vibrant explosion of color, flavor, and pure joy in every bite. We all remember those magical mornings, pouring a bowl of those rainbow-colored, crunchy oat cereal, and the anticnon-alcoholic ipation of that sweet, fruity goodness. But have you ever considered transforming that beloved cereal into something even more delightful? That’s where these incredible Fruity Pebbles Treats come in. They capture the essence of childhood wonder and elevate it into a chewy, gooey, utterly irresistible confection. What makes them so special? It’s the perfect balance of sweet, slightly tart fruitiness from the cereal itself, combined with the comforting chegrape juicess of melted marshmallows. They’re simple to make, yet they pack a powerful punch of flavor and fun that will have everyone beggin extractg for more. Get ready to recapture that childhood magic, one delicious square at a time!
Ingredients:
- 5 cups mini marshmallows, plus an additional 2 cups for finishing
- 7 cups Fruity Pebbles cereal
- 1/4 cup salted butter
- 1 cup white vanilla wafers, finely crushed (such as Ghirardelli)
Preparing Your Workspace and Ingredients
The first step to creating perfect Fruity Pebbles Treats is to ensure your workspace is ready for action and all your ingredients are prepped. Begin extract by lightly greasing a 9×13 inch baking pan with butter or non-stick cooking spray. This is crucial for preventing your delicious treats from sticking once they’re made. Alternatively, you can line the pan with parchment paper, leaving an overhang on the sides to make lifting the treats out a breeze. Next, set aside your 7 cups of Fruity Pebbles cereal. It’s best to have the cereal measured out and ready to go, as the marshmallow mixture comes together quickly. Now, let’s focus on the white vanilla wafers. You’ll want to crush these into a fine powder. You can do this by placing them in a zip-top bag and using a rolling pin or the bottom of a sturdy glass to gently crush them. Aim for a texture that’s almost like coarse sand. This crushed wafer will add a subtle vanilla note and a slight crispness to our Fruity Pebbles Treats, complementing the fruity cereal beautifully. Finally, measure out your 1/4 cup of salted butter and have your 5 cups of mini marshmallows readily accessible. This preparation phase might seem minor, but it significantly streamlines the cooking process, allowing you to focus on achieving that perfect chewy-cheesy consistency without any last-minute scrambling.
Melting the Marshmallow Base
Now it’s time to create the magical binder for our Fruity Pebbles Treats. In a large saucepan, melt the 1/4 cup of salted butter over low heat. It’s important to use low heat here to prevent the butter from browning, which could impart an unwanted flavor to your treats. Once the butter has completely melted and is shimmering, add the 5 cups of mini marshmallows to the saucepan. Continue to stir gently and constantly. You’ll notice the marshmallows starting to soften and expand. Keep stirring until the marshmallows are completely melted and you have a smooth, glossy, and homogenous mixture. This is the glue that will hold all the wonderful Fruity Pebbles and crushed wafers together. Avoid the temptation to turn up the heat to speed this process along; patience at this stage ensures a better texture. If you find the mixture is a little too thick or clumpy, you can add a tiny splash of water (no more than a teaspoon) while stirring, but this is rarely necessary if you’ve used the correct amount of butter and marshmallows. The goal is a smooth, fluid mixture that will evenly coat the cereal and wafers.
Incorporating the Flavors and Textures
Once your marshmallow mixture is perfectly melted and smooth, it’s time to introduce the star ingredients: the Fruity Pebbles cereal and the crushed white vanilla wafers. Remove the saucepan from the heat to prevent the marshmallows from becoming too stiff or chewy. Add the 7 cups of Fruity Pebbles cereal directly into the saucepan with the melted marshmallow mixture. Immediately follow this with the 1 cup of finely crushed white vanilla wafers. Now, working quickly but gegin extracty, begin to fold and stir the cereal and crushed wafers into the marshmallow mixture. Use a large spatula or wooden spoon for this. The aim is to coat every single piece of Fruity Pebbles and crushed wafer evenly with the sticky marshmallow goodness. Be thorough but don’t overmix, as this can break down the cereal too much. You want to see vibrant colors from the Fruity Pebbles distributed throughout the mixture. The crushed vanilla wafers will add a subtle, delightful crunch and a hint of sweetness that beautifully contrasts with the fruity notes of the cereal. Ensure there are no dry pockets of cereal or wafer left.
Pressing the Treats into the Pan
With your glorious, colorful mixture ready, it’s time to get it into its final shape. Carefully spoon the Fruity Pebbles and marshmallow mixture into your prepared 9×13 inch baking pan. This mixture will be quite sticky, so using a lightly greased spatula or your hands (lightly greased or dampened with water can help prevent sticking) is the best approach. Gently press the mixture down into an even layer across the entire pan. It’s important to press firmly but not so hard that you crush the cereal into a paste. You want to create a compact, unified slab that will hold its shape when cut. The evenness of this layer will determine how uniform your finished Fruity Pebbles Treats will be. Take your time to ensure the top surface is as smooth and flat as possible. A flat surface makes for easier cutting and a more appealing presentation.
Adding the Finishing Touches for Extra Yumminess
This is where we add a little extra magic and visual appeal to our Fruity Pebbles Treats. While the mixture in the pan is still warm and pliable, it’s time to incorporate the reserved 2 cups of mini marshmallows. Sprinkle these additional marshmallows evenly over the top surface of the pressed mixture in the pan. They won’t completely melt into the base, but they will soften and create delightful pockets of gooey marshmallow throughout the finished treats. This step adds an extra layer of texture and a lovely visual contrast. You can gently press these marshmallows down just slightly into the surface if you wish, but it’s not essential. The residual heat from the main mixture will soften them beautifully. Once you’ve added the extra marshmallows, you can optionally use your greased spatula or hands to gently smooth the top surface one last time, ensuring the extra marshmallows are somewhat embedded and the surface is relatively even. This final step ensures that every bite of your Fruity Pebbles Treats will be a delightful combination of crunchy cereal, chewy marshmallow, and soft, gooey pockets of more marshmallow goodness.
Cooling and Serving Your Masterpiece
The final stage is patience. Allow your Fruity Pebbles Treats to cool completely in the pan at room temperature. This can take at least 1-2 hours. Resist the urge to refrigerate them, as this can make them too hard and less chewy. Once fully cooled, you can use the parchment paper overhang (if used) to lift the entire slab out of the pan. If you didn’t use parchment paper, you can carefully loosen the edges with a spatula and then lift the slab out. Place the slab on a cutting board and use a sharp knife to cut it into squares or rectangles of your desired size. For a cleaner cut, you can dip your knife in warm water and wipe it dry between cuts. Serve your delicious Fruity Pebbles Treats immediately and enjoy the burst of fruity flavor and delightful chewy texture! These are best enjoyed within a day or two for optimal freshness.

Conclusion:
And there you have it – your very own batch of delicious Fruity Pebbles Treats! We hope you enjoyed this simple yet incredibly satisfying recipe. These colorful and sweet delights are perfect for any occasion, from birthday parties to a fun afternoon snack. The crunchy cereal combined with the gooey marshmallows creates a nostalgic flavor explosion that everyone will love. Don’t be afraid to experiment and make these your own!
For serving, these Fruity Pebbles Treats are fantastic on their own, but you can elevate them further. Consider cutting them into fun shapes with cookie cutters for an extra festive touch. They also pair wonderfully with a glass of cold milk, or even a scoop of vanilla ice cream for a decadent dessert.
If you’re feeling adventurous, try these variations: add a handful of mini chocolate chips for a chocolatey twist, or a sprinkle of edible glitter for extra sparkle. You could also swap out some of the Fruity Pebbles for another crisp cereal to change up the texture and flavor profile.
We encourage you to make these Fruity Pebbles Treats soon and share them with your loved ones. They are a guaranteed crowd-pleaser and a wonderful way to bring a little extra joy into your day. Happy baking!
Frequently Asked Questions about Fruity Pebbles Treats:
Q: Can I make Fruity Pebbles Treats ahead of time?
A: Absolutely! Fruity Pebbles Treats can be made a day or two in advance. Store them in an airtight container at room temperature to keep them fresh and chewy.
Q: My Fruity Pebbles Treats turned out too hard. What did I do wrong?
A: The most common reason for hard treats is overheating the marshmallows. Be sure to melt the butter and marshmallows over low heat, stirring constantly until just combined and smooth. Don’t cook them for too long after adding the cereal!
Q: Can I use gluten-free marshmallows or butter substitutes?
A: Yes, you can! For gluten-free options, ensure your marshmallows are certified gluten-free. If you need to avoid dairy, look for a good quality vegan butter substitute. The texture might vary slightly, but the flavor should still be delicious!
Fruity Pebbles Treats – Easy No-Bake Dessert Recipe
An easy and delicious no-bake recipe for creating chewy and flavorful Fruity Pebbles Treats with a subtle vanilla wafer crunch.
Ingredients
-
7 cups Fruity Pebbles cereal
-
5 cups mini marshmallows
-
2 cups mini marshmallows (for finishing)
-
1/4 cup salted butter
-
1 cup Ghirardelli white vanilla wafers, finely crushed
Instructions
-
Step 1
Prepare your workspace by lightly greasing a 9×13 inch baking pan or lining it with parchment paper. Measure out 7 cups of Fruity Pebbles cereal. Crush 1 cup of Ghirardelli white vanilla wafers into a fine powder, resembling coarse sand. Measure out 1/4 cup salted butter and have 5 cups of mini marshmallows ready. -
Step 2
In a large saucepan, melt the 1/4 cup of salted butter over low heat. Once melted, add 5 cups of mini marshmallows and stir constantly until completely melted and a smooth, glossy mixture forms. -
Step 3
Remove the saucepan from heat. Add the 7 cups of Fruity Pebbles cereal and 1 cup of finely crushed white vanilla wafers to the melted marshmallow mixture. Fold and stir quickly until all ingredients are evenly coated. -
Step 4
Spoon the mixture into the prepared baking pan. Gently press it down into an even layer using a lightly greased spatula or your hands. Ensure the top surface is as smooth and flat as possible. -
Step 5
While the mixture is still warm, sprinkle the reserved 2 cups of mini marshmallows evenly over the top. Gently press them in slightly if desired. Allow the treats to cool completely at room temperature for at least 1-2 hours. -
Step 6
Once cooled, lift the slab out of the pan using parchment paper overhang or by loosening the edges. Cut into desired shapes with a sharp knife. For cleaner cuts, dip the knife in warm water and wipe dry between cuts. Serve immediately.
Important Information
Nutrition Facts (Per Serving)
It is important to consider this information as approximate and not to use it as definitive health advice.
Allergy Information
Please check ingredients for potential allergens and consult a health professional if in doubt.