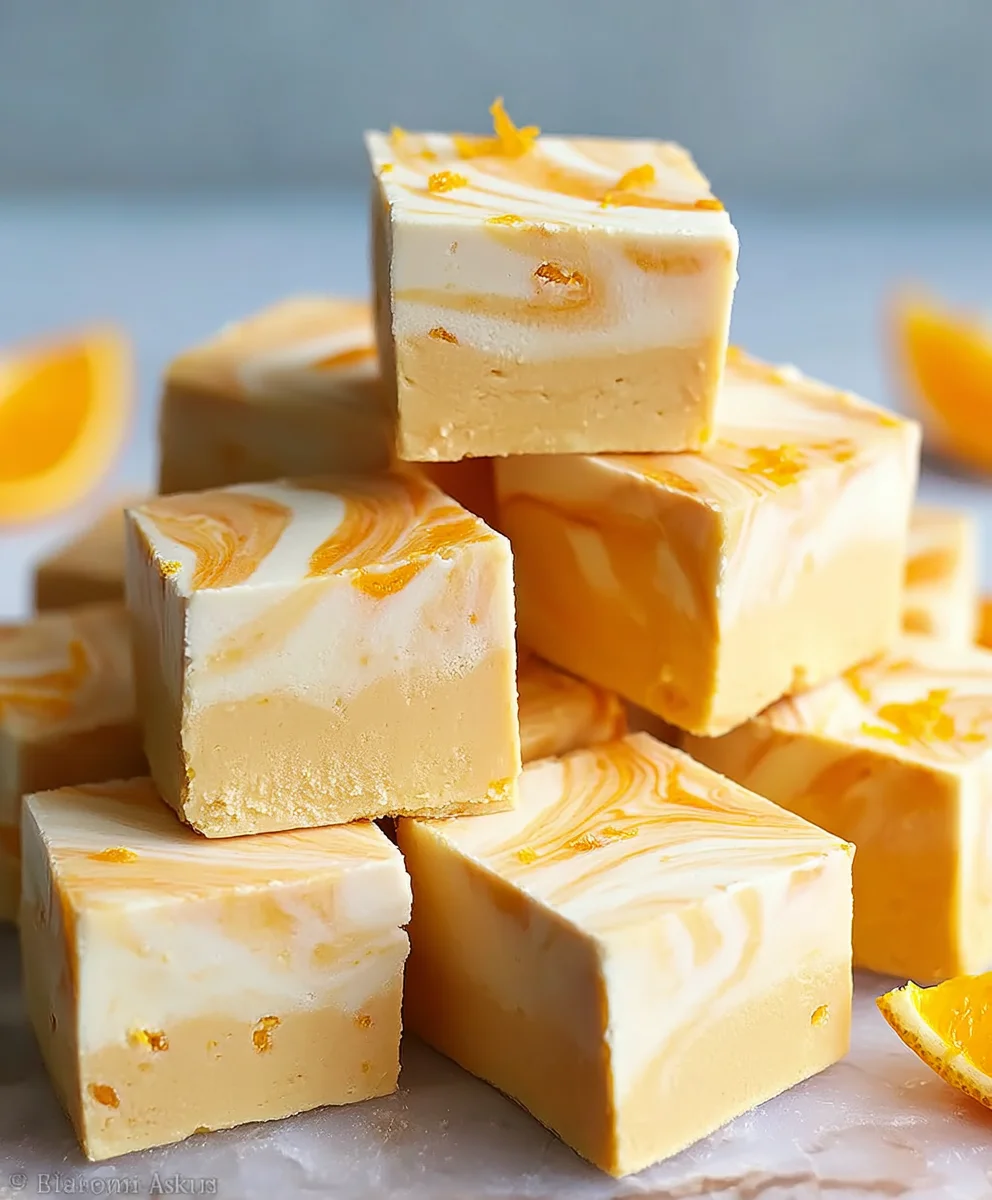
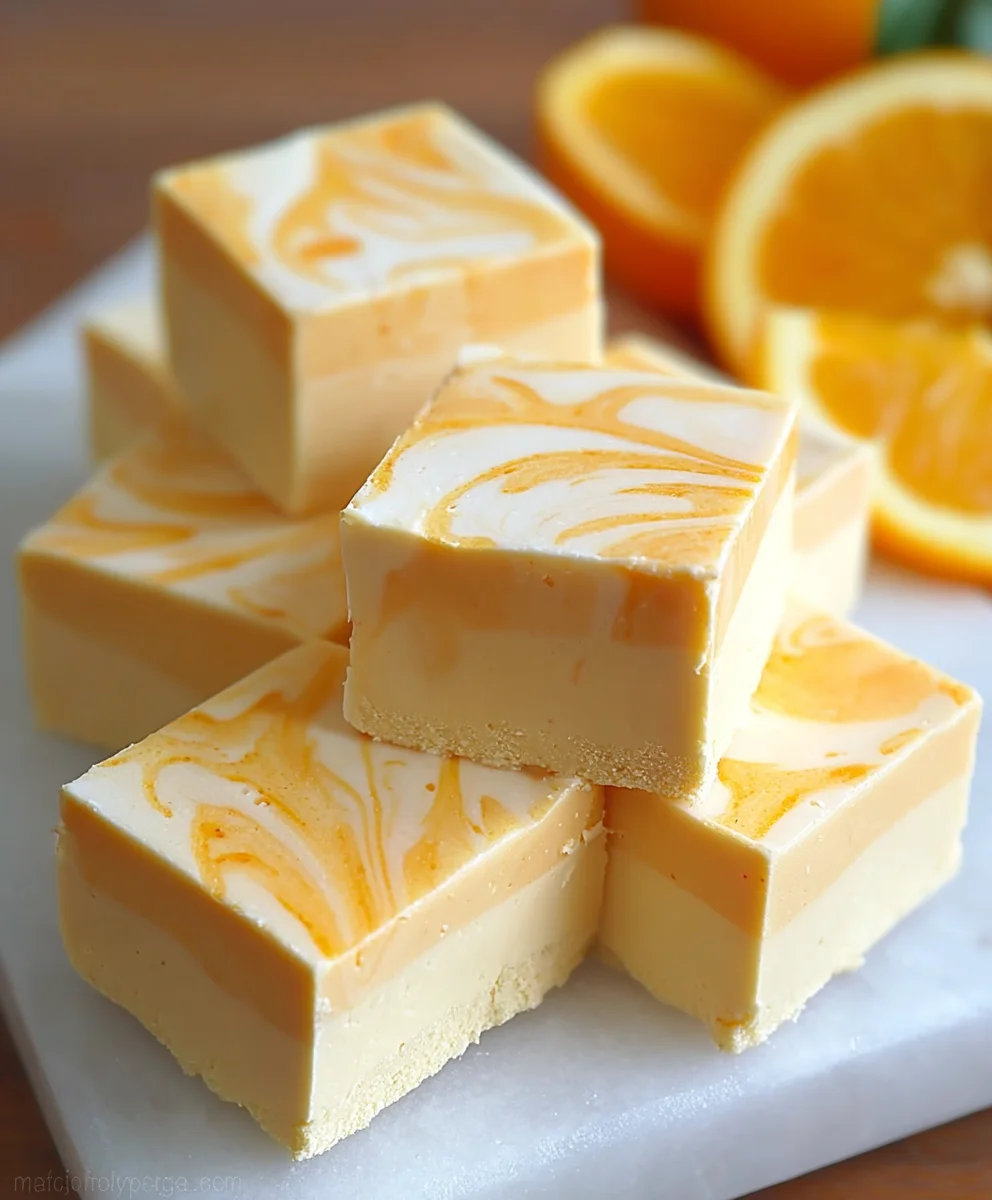
Orange Dreamsicle Fudge Recipe-Creamy Orange Treat
Orange Dreamsicle Fudge is more than just a sweet treat; it’s a nostalgic journey back to carefree summer days, captured in every creamy, melt-in-your-mouth bite. If you’ve ever savored the iconic flavor combination of vibrant orange and sweet, creamy vanilla, then this fudge is destined to become your new obsession. It’s the perfect way to evoke those childhood memories of ice cream trucks and sunshine. What makes this particular Orange Dreamsicle Fudge so special? It’s the incredible balance of citrusy zest and smooth vanilla, creating a symphony of flavors that’s both refreshing and comforting. Unlike some overly sweet candies, this recipe achieves a delightful tang that cuts through the richness, leaving you craving just one more piece. Get ready to whip up a batch of pure bliss that will transport your taste buds and impress everyone lucky enough to try it.
Ingredients:
- 2/3 cup heavy cream, for richness and a silky mouthfeel.
- 3 cups granulated sugar, providing the foundational sweetness.
- 3/4 cup unsalted butter, melted to ensure a smooth, consistent fudge base.
- 7 oz marshmallow cream, the secret ingredient for that irresistible fluffy texture.
- 2 cups white chocolate chips, forming the creamy, sweet foundation of our Orange Dreamsicle Fudge.
- 3 teaspoons orange extract, delivering that bright, authentic citrusy punch.
- Orange food coloring (up to 10 drops), essential for creating the beautiful, iconic swirled appearance.
Preparing Your Workspace and Equipment
Before we begin extract the magical transformation of these ingredients into Orange Dreamsicle Fudge, it’s crucial to have everything prepared. This recipe involves working with hot sugar, so efficiency is key. Line an 8×8 inch baking pan with parchment paper, leaving an overhang on the sides. This overhang will act as handles, making it super easy to lift the fudge out of the pan once it’s set. A light greasing of the parchment paper itself with a bit of non-stick cooking spray or a thin layer of butter can also prevent any stubborn sticking. Gather all your ingredients and have them measured out and ready to go. Melting the butter in advance will save you precious seconds when it’s time to combine it with other hot ingredients.
Cooking the Fudge Base
We’ll start by building the luscious base for our Orange Dreamsicle Fudge. In a large, heavy-bottomed saucepan, combine the granulated sugar, melted unsalted butter, and heavy cream. Place the saucepan over medium heat. Stir the mixture constantly with a wooden spoon or heat-resistant spatula. It’s important to keep stirring to prevent the sugar from scorching on the bottom of the pan. As the mixture heats, the sugar will dissolve, and the butter will fully incorporate, creating a smooth liquid. Continue to cook this mixture, stirring frequently, until it reaches a rolling boil. Once it reaches a boil, stop stirring for precisely 5 minutes. This controlled boiling is essential for achieving the correct consistency for the fudge. Be vigilant during this 5-minute period; a watched pot will eventually boil, but don’t let it boil over!
Incorporating the Creaminess
After the 5 minutes of boiling, remove the saucepan from the heat immediately. This is where the magic really starts to happen. Add the marshmallow cream and the white chocolate chips to the hot sugar mixture. The residual heat from the sugar syrupgin extractll begin to melt the chocolate chips and soften the marshmallow cream. Now, stir vigorously and continuously. This stirring is critical to ensure the marshmallow cream and white chocolate chips melt completely and are thoroughly incorporated into the base, creating a smooth, glossy, and wonderfully creamy texture. Keep stirring until you can no longer see any streaks of white chocolate or lumps of marshmallow cream. The mixture will become thick and luxurious. This step demands a bit of arm power, but the reward of perfectly smooth fudge is well worth the effort.
Infusing the Dreamsicle Flavor
Once the fudge base is smooth and homogenous, it’s time to infuse it with that unmistakable Orange Dreamsicle flavor. Stir in the orange extract. Be generous with the extract as it’s what gives our fudge its signature citrusy aroma and taste. Make sure it’s evenly distributed throughout the mixture. Now, for the visual appeal: divide the fudge mixture into two roughly equal portions in separate bowls. To one portion, add the orange food coloring, starting with a few drops and adding more, up to 10 drops, until you achieve your desired vibrant orange hue. Gently stir the food coloring into this portion until the color is uniform. The other portion will remain its creamy white color, creating the “dreamsicle” effect when swirled together.
Creating the Swirl and Setting the Fudge
With our two colored portions ready, it’s time to bring them together in a beautiful swirl. Pour the white fudge mixture into the prepared baking pan first. Then, dollop spoonfuls of the orange fudge mixture over the white fudge. Don’t worry about perfection at this stage; uneven placement is actually beneficial for creating a more natural-looking swirl. Next, take a butter knife or a skewer and gently swirl the two colors together. Make just a few passes through the mixture; over-swirling will muddy the colors. Aim for distinct streaks and marbling. Once you’re happy with the swirl, gently spread the fudge evenly in the pan, smoothing the top as best as you can without disturbing the swirl too much. Let the fudge set at room temperature for at least 2-3 hours, or until firm to the touch. For faster setting, you can place it in the refrigerator for about an hour, but allow it to come back to room temperature before cutting for the best texture. Once it’s fully set, use the parchment paper overhangs to lift the entire block of fudge out of the pan. Place it on a cutting board and cut it into squares using a sharp knife. For clean cuts, you can warm your knife under hot water and dry it thoroughly between each cut.
Conclusion:
And there you have it – your very own batch of delightful Orange Dreamsicle Fudge! This recipe is a wonderful way to capture the nostalgic flavors of a classic frozen treat in a creamy, melt-in-your-mouth confection. We’ve walked through each step to ensure your fudge turns out perfectly smooth and packed with that unmistakable citrusy sweetness. Now it’s time to enjoy your creation!
This Orange Dreamsicle Fudge is fantastic served as is, but it also pairs beautifully with a cup of coffee or tea. For a more elaborate dessert, consider crum extractbling it over vanilla ice cream or serving it alongside a light fruit salad. Don’t be afraid to get creative with the presentation – a dusting of powdered sugar or some candied orange peel can elevate it even further.
If you’re feeling adventurous, try adding a touch of vanilla bean paste for an even richer flavor, or experiment with different citrus zests like Meyer lemon or grapefruit for a unique twist. The possibilities are endless when you’re working with such a versatile and beloved flavor profile.
I truly hope you enjoyed making and savoring this Orange Dreamsicle Fudge as much as I do. It’s a simple recipe that brings big smiles and sweet memories. Happy baking, and may your fudge always be smooth and delicious!
Frequently Asked Questions:
Q: My Orange Dreamsicle Fudge is grainy. What did I do wrong?
A: Graininess often occurs if the sugar doesn’t fully dissolve or if the fudge is cooled too quickly. Ensure you’re stirring the mixture constantly over medium heat until the sugar is completely dissolved before boiling. Also, avoid agitating the fudge too much as it cools, and let it set undisturbed.
Q: How should I store my Orange Dreamsicle Fudge?
A: Properly stored, your Orange Dreamsicle Fudge will last for about 1-2 weeks. It’s best kept in an airtight container at cool room temperature. If your kitchen tends to be warm, you can refrigerate it, but allow it to come to room temperature before serving for the best texture.
Orange Dreamsicle Fudge
A creamy and delightful Orange Dreamsicle Fudge recipe with a vibrant swirled appearance.
Ingredients
-
2/3 cup heavy cream
-
3 cups granulated sugar
-
3/4 cup unsalted butter
-
7 oz marshmallow cream
-
2 cups white chocolate chips
-
3 teaspoons orange extract
-
Orange food coloring (up to 10 drops)
Instructions
-
Step 1
Prepare your workspace by lining an 8×8 inch baking pan with parchment paper, leaving an overhang. Lightly grease the parchment paper. Gather and measure all ingredients. -
Step 2
In a large, heavy-bottomed saucepan, combine granulated sugar, melted unsalted butter, and heavy cream. Cook over medium heat, stirring constantly, until it reaches a rolling boil. Stop stirring and boil for precisely 5 minutes. -
Step 3
Remove the saucepan from heat. Add marshmallow cream and white chocolate chips. Stir vigorously until completely melted and incorporated, creating a smooth, glossy, and creamy texture. -
Step 4
Stir in the orange extract. Divide the mixture into two equal portions. Add orange food coloring (up to 10 drops) to one portion until a vibrant orange hue is achieved. Leave the other portion white. -
Step 5
Pour the white fudge mixture into the prepared pan. Dollop spoonfuls of the orange fudge mixture over it. Gently swirl the colors together with a knife or skewer for a marbled effect. Smooth the top gently. -
Step 6
Let the fudge set at room temperature for at least 2-3 hours, or until firm. For faster setting, refrigerate for about an hour. Lift the fudge out using the parchment paper overhangs, cut into squares with a sharp knife.
Important Information
Nutrition Facts (Per Serving)
It is important to consider this information as approximate and not to use it as definitive health advice.
Allergy Information
Please check ingredients for potential allergens and consult a health professional if in doubt.