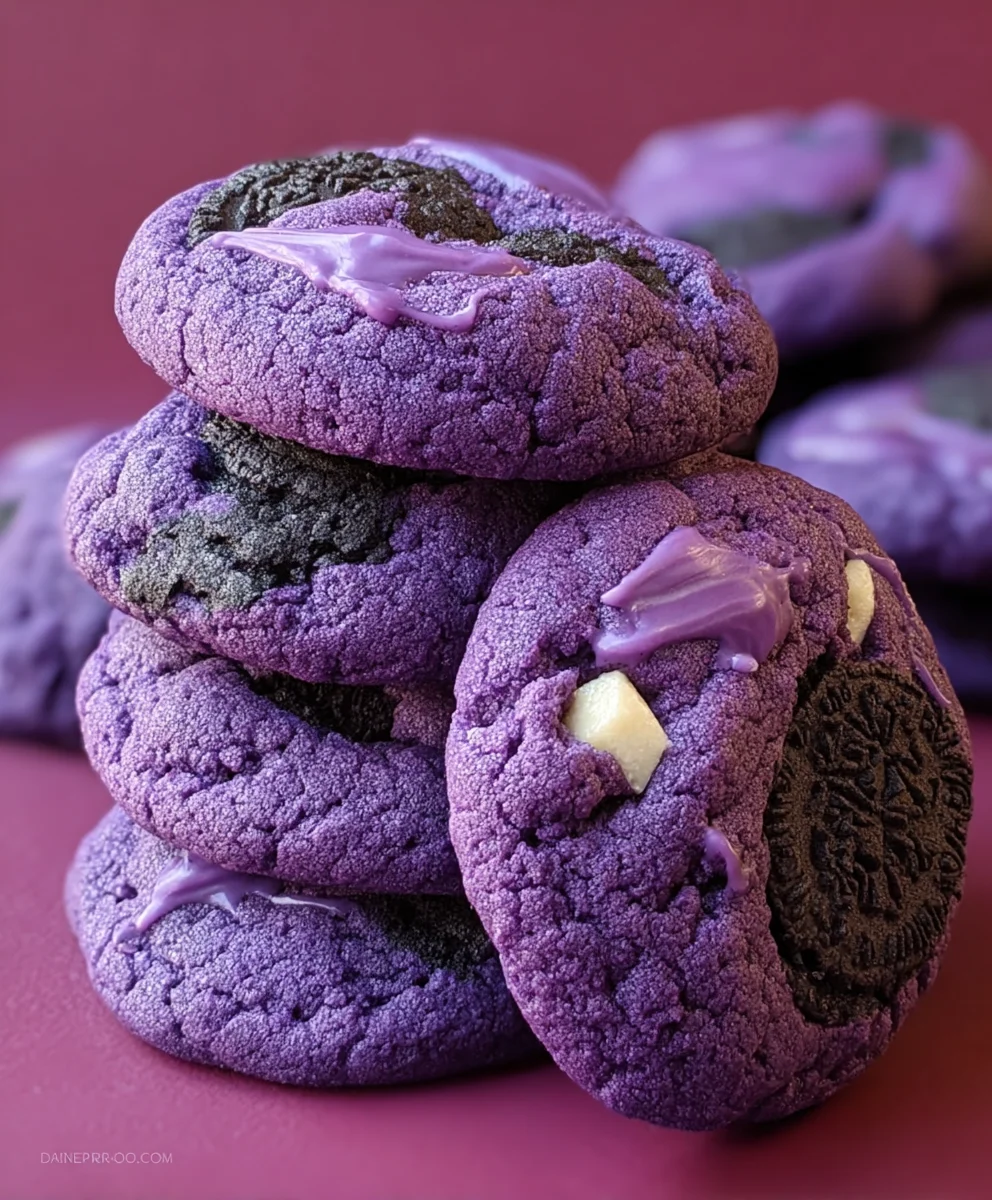
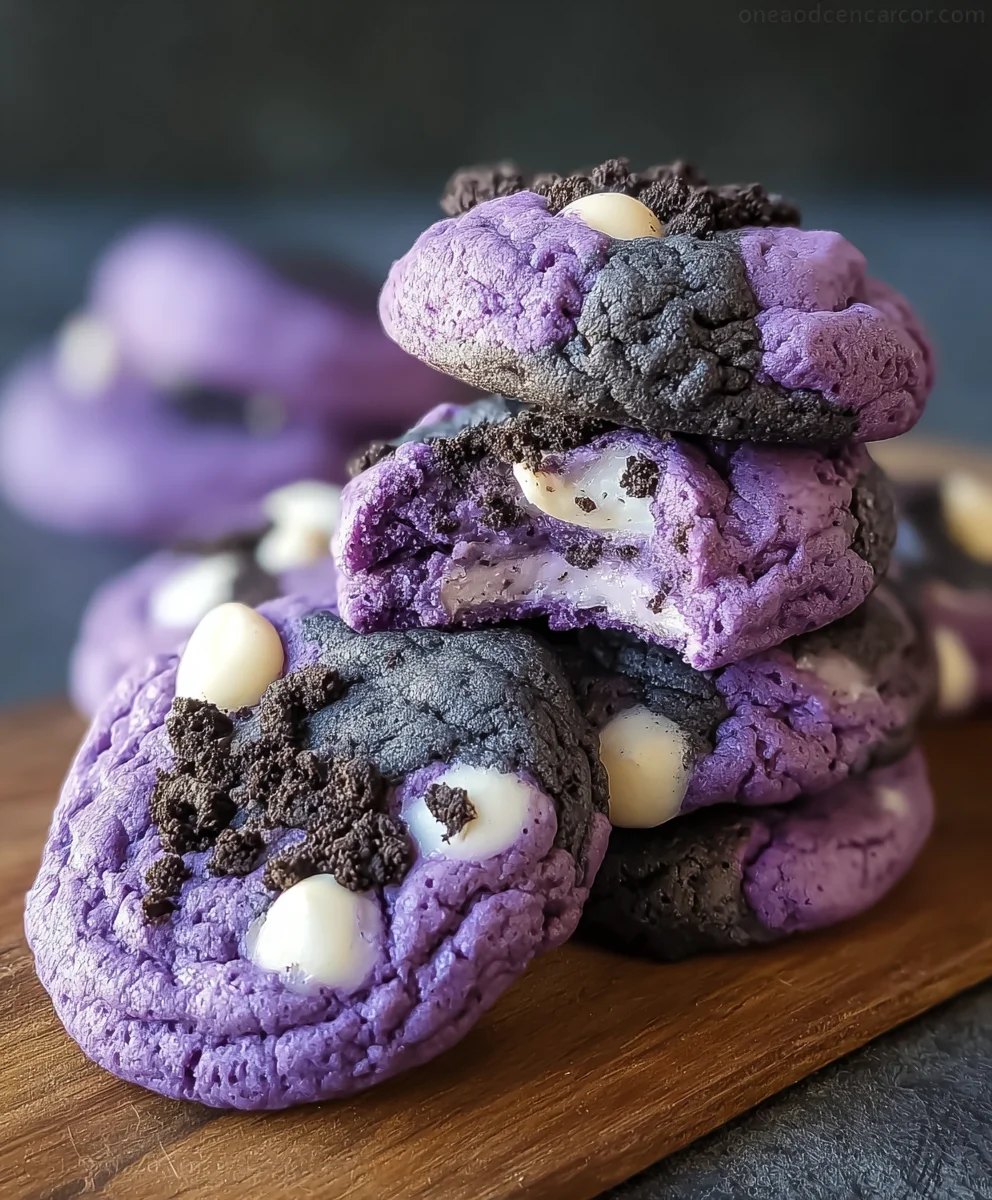
Ube Cookies and Cream Cookies Recipe
Ube Cookies and Cream Cookies are more than just a sweet treat; they’re a vibrant explosion of color and flavor that captures the hearts (and taste buds!) of everyone who tries them. If you’ve ever been captivated by the striking purple hue of ube, or found yourself drawn to the comforting classic of cookies and cream, then this recipe is about to become your new obsession. What makes these Ube Cookies and Cream Cookies so incredibly special? It’s the magical fusion of earthy, slightly nutty ube with the familiar, delightful crunch and creamy swirls of traditional cookies and cream. This isn’t just a cookie; it’s an experience. The aroma alone is enough to transport you to a happy place, and the first bite is pure bliss. They’re perfect for a special occasion, a delightful afternoon pick-me-up, or simply when you want to add a pop of joy to your day. Get ready to impress yourself and everyone you share them with!
Ingredients:
- ½ tsp baking soda
- ¼ tsp salt
- 1 ¼ cups all-purpose flour
- ½ cup unsalted butter, browned
- ¼ cup light brown sugar
- ¼ cup dark brown sugar
- ¼ cup granulated sugar
- 1 egg, room temperature
- 1 tsp vanilla extract
- 1 tsp ube extract
- ¼ cup ube halaya (sweetened purple yam jam)
- 8 Oreos, cut into chunks
- ¼ cup white chocolate chips
Preparing the Dough
First things first, let’s get our dry ingredients ready. In a medium-sized bowl, whisk together the 1 ¼ cups of all-purpose flour, ½ teaspoon of baking soda, and ¼ teaspoon of salt. Whisking these together ensures that the leavening agent and salt are evenly distributed throughout the flour, which is crucial for consistent cookie texture and rise. Set this bowl aside for now.
Now, for the wet ingredients and sugars, which form the heart of our cookie dough. In a large bowl, you’ll need your ½ cup of unsalted butter that has been browned. Browning the butter adds a wonderful nutty depth of flavor and a slightly chewier texture to the cookies. To brown butter, simply melt unsalted butter in a light-colored saucepan over medium heat. Continue to cook, swirling occasionally, until the milk solids at the bottom turn a golden brown and the butter smells fragrant and toasty. This usually takes about 5-8 minutes. Be careful not to burn it! Once browned, let it cool slightly before proceeding.
To the slightly cooled browned butter, add your sugars: ¼ cup of light brown sugar, ¼ cup of dark brown sugar, and ¼ cup of granulated sugar. The combination of different sugars contributes to the cookie’s texture and sweetness. Brown sugars add moisture and a chewy element, while granulated sugar contributes to crisp edges. Cream these sugars together with the browned butter until the mixture is smooth and well combined. A stand mixer with the paddle attachment or a hand mixer makes this process quick and easy, but you can also achieve this with a sturdy whisk and some elbow grease.
Next, incorporate the binders and flavor enhancers. Add the 1 egg, making sure it’s at room temperature. Room temperature eggs emulsify better into the dough, leading to a smoother and more consistent texture. Beat the egg into the sugar and butter mixture until it’s fully incorporated. Then, add the 1 teaspoon of vanilla extract for classic cookie aroma and flavor, and the 1 teaspoon of ube extract. The ube extract is what will give our cookies their signature vibrant purple color and distinct, delightful ube flavor. Mix until just combined.
Finally, for the star ingredient: the ube halaya. Gently fold in the ¼ cup of ube halaya into the wet ingredients. Ube halaya is a thick, sweet jam made from purple yams, and it will add an intense ube flavor and a beautiful, soft purple hue to the dough. Don’t overmix at this stage; you want the ube halaya to be visible in swirls.
Combining and Adding Mix-ins
Now it’s time to bring the wet and dry ingredients together. Gradually add the flour mixture to the wet ingredients, mixing on low speed or by hand until just combined. Be careful not to overmix the dough. Overmixing can develop the gluten in the flour too much, resulting in tough cookies. You should still see a few streaks of flour; that’s perfectly fine.
This is where the fun really begin extracts! Gently fold in your chopped Oreos and white chocolate chips. I like to cut my 8 Oreos into chunky pieces rather than finely crushing them so that you get delightful pockets of chocolatey cookie crunch in every bite. Distribute the ¼ cup of white chocolate chips evenly throughout the dough. Again, fold these in gently to avoid overmixing. The goal is to have a beautifully marbled dough with pops of dark chocolate from the Oreos and creamy sweetness from the white chocolate chips, all enveloped in that gorgeous purple hue.
Chilling and Baking
For the best texture and to prevent excessive spreading, it’s highly recommended to chill your cookie dough. Cover the bowl with plastic wrap and refrigerate for at least 30 minutes, or up to 2 days. Chilling allows the fats in the butter to solidify, which helps the cookies hold their shape better during baking, leading to thicker, chewier cookies. While the dough is chilling, preheat your oven to 350°F (175°C) and line baking sheets with parchment paper. The parchment paper prevents sticking and makes for easy cleanup.
Once the dough is chilled, scoop generous portions onto the prepared baking sheets. I like to use a cookie scoop (about 2 tablespoons in size) for uniform cookies. Place the dough balls about 2 inches apart, as they will spread during baking. For an even more appealing look, you can gently press a few extra chunks of Oreo and a few white chocolate chips onto the tops of the dough balls before baking. This adds a touch of visual flair and ensures those delicious mix-ins are prominent.
Bake the cookies for 9-12 minutes, or until the edges are lightly golden brown and the centers still look slightly soft and underbaked. They will continue to cook and set on the baking sheet as they cool. Overbaking can lead to dry, hard cookies, so err on the side of slightly underbaked. For the most consistent results, rotate your baking sheets halfway through the baking time.
Cooling and Enjoying
Once baked, let the cookies cool on the baking sheets for about 5-10 minutes before transferring them to a wire rack to cool completely. This is a crucial step as the cookies are very delicate when hot and can break apart if moved too soon. As they cool on the baking sheet, they will firm up. Once they are cool enough to handle, carefully move them to a wire rack to finish cooling. This allows air to circulate around them, preventing the bottoms from becoming soggy. Once completely cooled, your Ube Cookies and Cream Cookies are ready to be devoured. They are delicious enjoyed on their own, or with a cold glass of milk!
Conclusion:
We hope you’ve enjoyed diving into the delightful world of Ube Cookies and Cream Cookies! This recipe offers a truly unique and delicious treat, combining the earthy, slightly sweet flavor of ube with the classic, comforting crunch of cookies and cream. The vibrant purple hue of the ube makes these cookies not only a joy to eat but also a feast for the eyes, perfect for parties, bake snon-alcoholic ales, or simply a special homemade indulgence. We encourage you to give this recipe a try and experience the magic for yourself.
These Ube Cookies and Cream Cookies are wonderfully versatile. They are absolutely delicious on their own, perhaps with a glass of cold milk. For an extra special dessert, consider crum extractbling them over vanilla ice cream or using them as the base for a no-bake cheesecake. Don’t be afraid to get creative with variations! You could add a touch more white chocolate chips for extra sweetness or even a pinch of cinnamon to complement the ube. The possibilities are endless, and we can’t wait to hear about your delicious creations!
Frequently Asked Questions about Ube Cookies and Cream Cookies:
Q1: Where can I find ube extract or powder?
Ube extract or powder can typically be found in Asian grocery stores or well-stocked international food aisles in larger supermarkets. You might also find it online through various specialty food retailers. The extract provides a more concentrated flavor and color, while powder can be used as well, though you may need to adjust the amount.
Q2: My cookies are turning out a bit dry. What could be the reason?
Dry Ube Cookies and Cream Cookies can often be attributed to over-mixing the dough after adding the flour, or baking them for too long. When incorporating the dry ingredients, mix just until combined. For baking time, keep an eye on them; they should look slightly underdone in the center when you remove them from the oven, as they will continue to cook on the baking sheet. Ensure your ingredients, like butter and eggs, are at room temperature for optimal dough consistency.
Ube Cookies and Cream Cookies
Delicious Ube Cookies and Cream Cookies with a vibrant purple hue, chewy texture, and delightful mix-ins.
Ingredients
-
1 ¼ cups all-purpose flour
-
½ tsp baking soda
-
¼ tsp salt
-
½ cup unsalted butter, browned
-
¼ cup light brown sugar
-
¼ cup dark brown sugar
-
¼ cup granulated sugar
-
1 egg, room temperature
-
1 tsp vanilla extract
-
1 tsp ube extract
-
¼ cup ube halaya (sweetened purple yam jam)
-
8 Oreos, cut into chunks
-
¼ cup white chocolate chips
Instructions
-
Step 1
Whisk together flour, baking soda, and salt in a medium bowl. Set aside. -
Step 2
Cream together browned butter and all sugars until smooth. Beat in egg, vanilla extract, and ube extract until combined. -
Step 3
Gently fold in ube halaya until just combined, creating swirls of purple. -
Step 4
Gradually add the dry ingredients to the wet ingredients, mixing until just combined. Fold in Oreo chunks and white chocolate chips. -
Step 5
Chill the dough for at least 30 minutes. Preheat oven to 350°F (175°C) and line baking sheets with parchment paper. -
Step 6
Scoop dough onto baking sheets, about 2 inches apart. Bake for 9-12 minutes, until edges are lightly golden and centers are soft. -
Step 7
Cool on baking sheets for 5-10 minutes, then transfer to a wire rack to cool completely.
Important Information
Nutrition Facts (Per Serving)
It is important to consider this information as approximate and not to use it as definitive health advice.
Allergy Information
Please check ingredients for potential allergens and consult a health professional if in doubt.